google-site-verification: google70410e9e92d4fda2.html
Showing posts with label Techniques. Show all posts

Tuesday, 16 August 2016

A Festive Jar of Love Dry Embossed Handmade Card Using Stampin' Up! Products UK

Today's Card came about as I have begun thinking about the handmade gifts I am making for friends and family this year. Preserving is a bog love for me , and since we had an over abundance of gooseberries this year, I have already made a bumper batch of Gooseberry Jam Most of our gooseberry bushes are the Blush variety, and that is how this card came about. 
Rich Razzelberry, is about the same colour as my Jam. So I used the Rich Razzelberry Cardstock and dry embossed it with the Festive Textured Impressions Embossing Folder (TIEF)
Since I usually use Burlap or fabric to cover the lid of my jars, I replicated that fot the smallest of 

Everyday Jars Die Cut.

To give the Christmas Feel, I added a strip of that lush and very festive Gold Foiled  Affectionately Yours Designer Series Paper. Finally I added a few Gold Enamel Shapes (hearts) and stamped the sentiment from the Jar of Love stamp set and added banner ends before adding it as a tag for the jar.

You may also like to know, that there is a BUNDLE & SAVE 10% saving when you purchase the Stamp set and co-ordinating Framelits Dies Bundle

As always, there is a list of products below


Feel free to CASE any of my creative projects (Copy & Paste Everything)


STAMP SET
Jar of Love

CARDSTOCK
Ruch Razzelberry
Whisper White

INK PADS
Rich Razzelberry
Archival Gray
Archival Black
Soft Suede

DESIGNER SERIES PAPER
Affectionately Yours

FRAMELITS DIES
Every Day Jars

EMBOSSING FOLDER
Festive

ACCESSORIES
Metalic Enamel Dots

ADHESIVES
Stampin Dimensionals
Tombow

TOOLS
Stampin Trimmer
Magnetic Platform
Big Shot
Paper Snips
Bone Folder
Paper Piercing Tool


How to Contact or Follow Me


Kim Tolton, Independent Stampin Up Demonstrator.
Card & Papercraft Tutorials
Please feel free to comment below, and ask away with any questions. You can also find me via the links below


Blog:

Online Store:

Stamping @ The Warren Craft Forum:

Email:
kim.tolton@googlemail.com

youTube


Pinterest:

Google +

Facebook:

Twitter:

Instagram:
@kim.tolton

LinkedIn:

Saturday, 13 August 2016

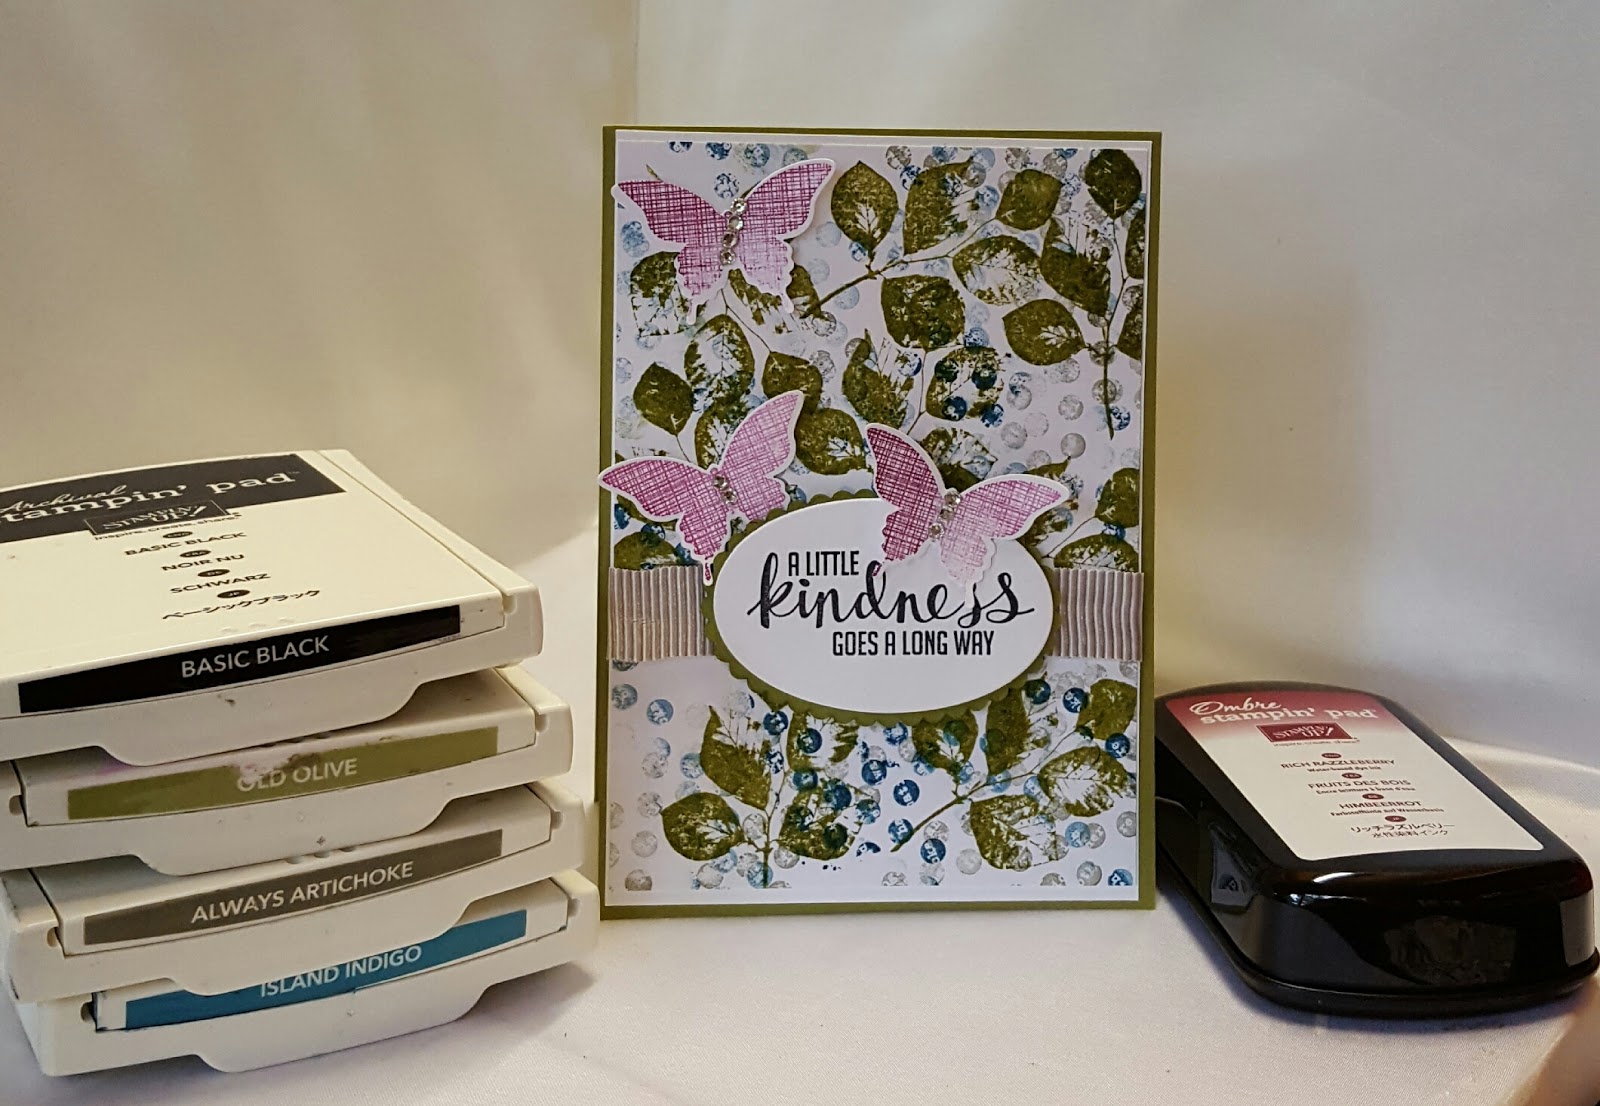
Collage Background for Handmade Cards Using Kinda Eclectic Stamp Set from Stampin' Up! UK

I hope you have a great weekend planned, and that the weather is as lovely as it is here in Essex UK?
We have our grandchildren staying with us, and will be taking them and our dogs to the Park for some fun time together

Before we go. I wanted to share with you the third of three cards with you featuring the

KINDA ECLECTIC
STAMP SET
 from Stampin' Up!

Kinda Eclectic is a Versatile Collage Stamp Set that is perfect for creating your own Designer Series Papers.
Despite using the same stamp set and ink pads for all three cards, each card has a unique look, just by altering the design template, dies and accessories

In this sample, the Island Indigo (blue) is much more prominent in this card.
The Rich Razzelberry Ombre Ink Pad, has again been used for the butterflies, and by using a different area of the ombre ink pad, you get different shades of colour for the butterflies.
I have kept the accessories simple with some Tip Top Taupe Mini Stripped Ribbon and Basic Rhinestones.

You can find a list of all the products used to create today's card listed below, and a link to my online store


Feel free to CASE any of my creative projects (Copy & Paste Everything)


PRODUCTS USED TODAY

STAMP SET
Kinda Eclectic

CARDSTOCK
Whisper White
Old Olive

INK PADS
island indigo
old olive
always artichoke
memento or archival black
Rich Razzelberry Ombre Ink Pad


DIES/PUNCHES
Elegant Butterfly Punch
Layering Ovals Framelits Dies

ACCESSORIES
Tip Top Taupe Mini Stripped Ribbon
Basic Rhinestones

TOOLS
Stampin Trimmer
Acrylic Blocks
Big Shot Die Cutting Machine
Magnetic Platform
bone folder
paper snips
paper piercing tool

ADHESIVES
mini glue dots
stampin dimensionals
tombow mutipurpose liquid glue
tear & tape adhesive


How to Contact or Follow Me

Kim Tolton, Independent Stampin Up Demonstrator.
Card & Papercraft Tutorials
Please feel free to comment below, and ask away with any questions. You can also find me via the links below


Blog:

Online Store:

Stamping @ The Warren Craft Forum:

Email:
kim.tolton@googlemail.com

youTube


Pinterest:

Google +

Facebook:

Twitter:

Instagram:
@kim.tolton

LinkedIn:

Tuesday, 9 August 2016

Kinda Eclectic Stamp Set & Creating Unique Backgrounds for your Handmade Cards Stampin' Up! UK

Today I am sharing with you the second card in a set of three that I made recently. They feature the Kinda Eclectic Stamp Set, and I used a combination of the stamps in the set to create a unique hand-stamped Designer Series Paper. This is always a great favourite technique in my Card & Papercraft Classes. Half the fun is getting really inky fingers to show the loving effort you put into creating  your card

The Colour-scheme is
Always Artichoke
Old Olive
Island Indigo &
Rich Razzelberry Ombre Ink Pad
The card base is Island Indigo to tie in with the stamped background on  

This set of cards, are very resourceful to make if you purchase one of the Ink Pad & Cardstock Assortment Bundles, giving you a saving compared to purchasing the items individually
In this case Most of the ink pads, come from the Regals Color Collection
The great thing about these colour collections, is that they are co-ordinated within their own colour collection AND all the other colour collections in the current Stampin' Up! Catalogue.

So if you are a novice card maker, or you are returning to Card making (or memory keeping), you can start creating immediately, as all the colour combo work is already done for you.

Plus, there is a large range of co-ordinating products, from ribbons, to decorative papers, rhinestones, pearls & ,much more
So have a go at creating your own backgrounds, then follow my Stamping At The Warren Community Pinterest Board (see the side bar on this blog) and I will invite you to join the board, where you can begin pinning your own creations (full details at the bottom of today's blog post

You will also find a list of products used today, a typed tutorial and a link to my online store

Feel free to CASE any of my creative projects (Copy & Paste Everything)


PRODUCTS USED TODAY

STAMP SET
Kinda Eclectic

INK PADS
Island Indigo
Always Artichoke
Old Olive
Memento Black
Rich Razzelberry Ombre Ink Pad

CARDSTOCK
Island Indigo
Whisper White

ACCESSORIES
Basic Rhinestones
Regals Enamel Shapes
Crumb Cake Stitched Satin Ribbon

PUNCH/FRAMELITS DIES
Layering Ovals
Elegant Butterfly

TOOLS
Big Shot Die Cutting Machine
Magnetic Platform
Stampin Trimmer
Paper Piercing Tool
Acrylic Blocks
Paper Snips
Bone Folder

ADHESIVES
Tombow Multi-purpose Liquid Glue
Stampin Dimensionals
Mini Glue Dots

Tutorial


  1. CARD BASE - Trim a piece of Island Indigo Cardstock to 30 x 10.5 cms; score long side at 14.9 cms; fold & Burnish
  2. Trim a piece of Whisper White Cardstock to 14.4 x 10.1 cms & adhere to the inside of the card base for your to write your greeting on (I used Tombow)
  3. Trim another piece of Whisper White Cardstock to 14.4 x 10.1 cms, this is going to be stamped to make your background; Begin by stamping the Ombre Ink Pad several times across the centre of the card base (horizontally) ... this gives a grungy feel to the background.
  4. Randomly Over-stamp this panel with the dotty stamp using Island Indigo Ink Pad, with 4th generation stamping technique (this means you ink up the stamp & stamp the cardstock four times before re-inking the stamp) 
  5. Using the Island Indigo Ink Pad, stamp the Sunburst twice without re-inking (second generation stamping technique)
  6. Take the Leaf Stamp and onto scrap Whisper White Cardstock, stamp one leaf using Always Artichoke Ink Pad, and another using the Old Olive Ink Pad; Fussy cut these out using Paper Snips (remember to rotate the cardstock and not the scissors when fussy cutting)
  7. Stamp your sentiment onto another scrap of Cardstock in black ink and Die cut using the best fit Layering Oval Framelits Die
  8. Next, using the Ombre Ink Pad, stamp the larger butterfly three times onto scrap white cardstock, using a different area of the ink pad to get tonal differences.; Punch these out using the elegant Butterfly Punch.
  9. Wrap around a piece of Stitched Satin Ribbon and tie a bow.
  10. Mat this panel onto the card base; add stampin dimensionals to the back of the sentiment and the leaves you cut out and mount into the card front; Add the butterfly's using Mini Glue Dots, Finish with some Enamel Shapes and basic Rhinestones


How to Contact or Follow Me


Kim Tolton, Independent Stampin Up Demonstrator.
Card & Papercraft Tutorials
Please feel free to comment below, and ask away with any questions. You can also find me via the links below


Blog:

Online Store:

Stamping @ The Warren Craft Forum:

Email:
kim.tolton@googlemail.com

youTube


Pinterest:

Google +

Facebook:

Twitter:

Instagram:
@kim.tolton

LinkedIn:

Thursday, 14 July 2016

Wherever You Go Masculine Card Stampin' Up! UK

I hope your day is as bright & Sunny as it is here in Essex. Yesterdays Thunderstorm is long gone, thank Goodness , as our Puppy doesn't much care for them!

And so today's card reflects the weather, using the 


WHEREVER YOU GO Stamp Set 
from Stampin' Up!

For another Masculine Card

The Sky Background was created using one of Stampin Up!s new Single Use Sponge Brayers with the Soft Sky Ink pad
The Sunburst  is stamped in  Daffodil Delight Ink, the Birds in Archival Grey, and the Bridge & Sentiment are stamped in Archival Black ink.

After Stamping the Sentiment, I die cut it using the Layering Oval Framelits & run through my Big Shot using the Magnetic Platform. The sentiment was then trimmed to give a straight base, and popped up using Stampin Dimensionals.

Supplies List  can be found below


·        Feel free to CASE any of my creative projects (Copy & Paste Everything)


PRODUCTS LIST

STAMP SET
WHEREVER YOU GO

CARDSTOCK
WHISPER WHITE
BASIC BLACK

INK PADS
ARCHIVAL BLACK
ARCHIVAL GRAY
DAFFODIL DELIGHT

FRAMELITS DIES
LAYERING OVALS

TOOLS
BIG SHOT DIE CUTTING MACHINE
STAMPIN TRIMMER
STAMPIN SPONGE
SPONGE BRAYER
PAPER SNIPS
BONE FOLDER

ADHESIVES
TOMBOW MULTIPURPOSE LIQUID GLUE
STAMPIN DIMENSIONALS


How to Contact or Follow Me


Kim Tolton, Independent Stampin Up Demonstrator.
Card & Papercraft Tutorials
Please feel free to comment below, and ask away with any questions. You can also find me via the links below


Blog:

Online Store:

Stamping @ The Warren Craft Forum:

Email:
kim.tolton@googlemail.com

youTube


Pinterest:

Google +

Facebook:

Twitter:

Instagram:
@kim.tolton

LinkedIn:

Monday, 11 July 2016

By The Tide Meets & Thoughtful Banners Stampin' Up! UK

OMG What a few days!! No internet (what a surprise) The Electricity Metere hads Died with dramatic floutish, so mo electrics (ne meter put in today). and all the soft friut in the garden has ripened over the past few days. So today, I have nbeen making the first 7Kg batch of Goosberry Jam, and another batch the same size to make tomorrow.

Anyhow, Today I am sharing a card commissioned by a customer. The brief was a fishing  themed Fathers Day Card

It did mean that I had to dig down into my HUGE collection of Retired Stamp Sets, which I coupled the Thoughtful Banners Stamp Set

The fish were stamped & fussy Cut out, and then given a watery glaze using my Chrystal Effects
I used ink pads from the Brights Collection to keep a cohesive colour-scheme, For the Card Base, I used Bermuda Bay, again, for that sea theme, the blue creates a halo of colour around the whole card.

Finally II used the Hopeful Thoughts Stamp Set, with the Co-ordinating Banner Duo Punch for the banner.

Thoughtful Banners is a super photopolymer stamp set, with 53 stamps in the set!! The Set covers most sentiments and relationship stamps that you need, plus a selection of Banner Styles.


PRODUCTS USED

STAMP SET
THOUGHTFUL BANNERS
BY THE TIDE (RETIRED)

CARDSTOCK
BERMUDA BAY
WHISPER WHITE

INK PADS
BERMUDA BAY
OLD OLIVE
RICH RAZZELBERRY
PACIFIC POINT
SOFT SUEDE

PUNCH
DUO BANNER PUNCH


ACCESSORIES
THICK BAKERS TWINE

TOOLS
STAMPIN TRIMMER
PAPER SNIPS
BONE FOLDER
PAINT BRUSH
CHRYSTAL EFFECTS
OR MOD PODGE

ADHESIVES
STAMPIN DIMENSIONALS
TOMBOW LIQUID GLUE


Feel free to CASE any of my creative projects (Copy & Paste Everything)


Tutorial

  1. Trim a piece of Bermuda Bay Cardstock to 30 x 10.5 cms; score at 14.9 cms; fold & Burnish
  2. Trim a piece of  Whisper White Cardstock to 14.4 x 10.1 cms; stamp the cardstock with the coral stamp, using Bermuda Bay Ink pad, stamping off first (remove some of the ink on the samp by stamping onto scrap paper, before stamping the cardstock)
  3. Over-stamp this with the  watery words stamp using the Soft Suede ink pad, and 3rd generation stamping technique (the amount of times you stamp before re-inking)
  4. Over-stamp the Coral using the Coral Stamp & Rich Razzelberry Ink Pad; & add a few Anchor images using Pacific Point Ink Pad.; Mat onto the card base.
  5. On some scrap paper, stamp a couple of fish using Old Olive ink Pad. Glaze these using either Chrystal Effects or Mod Podge; 
  6. Wrap around some Thicker Bakers Twine and tie a knot
  7. Once completely dry, fussy cut out the fish, add Stampin Dimensionals to the back and mount the fish onto the card base
  8. Stamp the banner of your choice, and the stamp the sentiment into the void on the banner; punch out using the Banner Duo Punch; add Stampin Dimensionals to the back and mount onto the top left corner of the card
 And here is my famous Gooseberry Jam

How to Contact or Follow Me


Kim Tolton, Independent Stampin Up Demonstrator.
Card & Papercraft Tutorials
Please feel free to comment below, and ask away with any questions. You can also find me via the links below


Blog:

Online Store:

Stamping @ The Warren Craft Forum:

Email:
kim.tolton@googlemail.com

youTube


Pinterest:

Google +

Facebook:

Twitter:

Instagram:
@kim.tolton

LinkedIn: