google-site-verification: google70410e9e92d4fda2.html
Showing posts with label papercraft. Show all posts

Monday, 15 August 2016

Shooting Star Slider Card Lovely As A Bee New Baby Card using Stampin' Up! Products UK


Feel free to CASE any of my creative projects (Copy & Paste Everything)


Watch the Video Below

Tutorial

PRODUCTS USED

Stamp Set - Shooting Star Stamp Set
Dies -  Sliding Star Framelits (bundle & Save 10% off option)

Cardstock  - Crushed Curry & Shimmery White

Adhesives - Foam Adhesive Strips & Stampin Dimensionals

Tools - Big Shot, Magnetic Platform, Stampin Trimmer, Acrylic Blocks, Bone Folder, Paper Snips

Ink Pads - Crushed Curry & Chocolate Chip

Trim - Crushed Curry Cardstock to 30 x 10.5 cms; score long side at 14.9 cms; Fold & Burnish
Trim - a second piece of Crushed curry Cardstock to 14.4 x 10.1 cms

How to Contact or Follow Me


Kim Tolton, Independent Stampin Up Demonstrator.
Card & Papercraft Tutorials
Please feel free to comment below, and ask away with any questions. You can also find me via the links below


Blog:

Online Store:

Stamping @ The Warren Craft Forum:

Email:
kim.tolton@googlemail.com

youTube


Pinterest:

Google +

Facebook:

Twitter:

Instagram:
@kim.tolton

LinkedIn:

Saturday, 13 August 2016

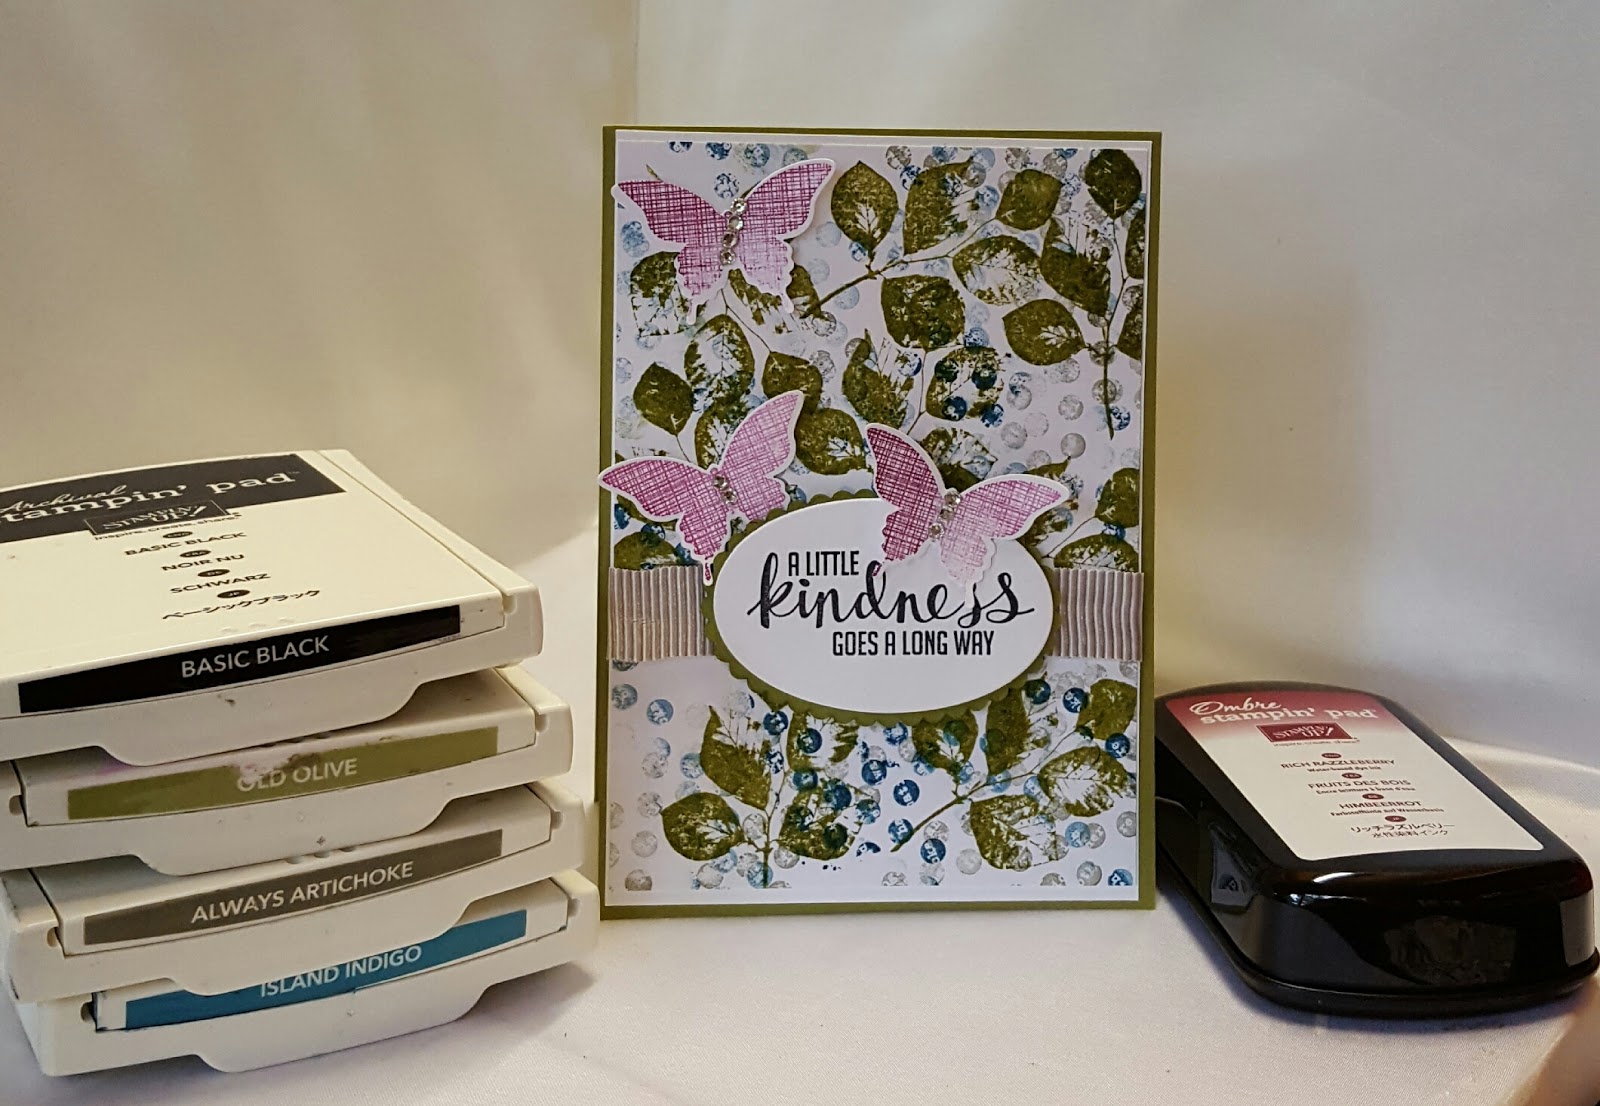
Collage Background for Handmade Cards Using Kinda Eclectic Stamp Set from Stampin' Up! UK

I hope you have a great weekend planned, and that the weather is as lovely as it is here in Essex UK?
We have our grandchildren staying with us, and will be taking them and our dogs to the Park for some fun time together

Before we go. I wanted to share with you the third of three cards with you featuring the

KINDA ECLECTIC
STAMP SET
 from Stampin' Up!

Kinda Eclectic is a Versatile Collage Stamp Set that is perfect for creating your own Designer Series Papers.
Despite using the same stamp set and ink pads for all three cards, each card has a unique look, just by altering the design template, dies and accessories

In this sample, the Island Indigo (blue) is much more prominent in this card.
The Rich Razzelberry Ombre Ink Pad, has again been used for the butterflies, and by using a different area of the ombre ink pad, you get different shades of colour for the butterflies.
I have kept the accessories simple with some Tip Top Taupe Mini Stripped Ribbon and Basic Rhinestones.

You can find a list of all the products used to create today's card listed below, and a link to my online store


Feel free to CASE any of my creative projects (Copy & Paste Everything)


PRODUCTS USED TODAY

STAMP SET
Kinda Eclectic

CARDSTOCK
Whisper White
Old Olive

INK PADS
island indigo
old olive
always artichoke
memento or archival black
Rich Razzelberry Ombre Ink Pad


DIES/PUNCHES
Elegant Butterfly Punch
Layering Ovals Framelits Dies

ACCESSORIES
Tip Top Taupe Mini Stripped Ribbon
Basic Rhinestones

TOOLS
Stampin Trimmer
Acrylic Blocks
Big Shot Die Cutting Machine
Magnetic Platform
bone folder
paper snips
paper piercing tool

ADHESIVES
mini glue dots
stampin dimensionals
tombow mutipurpose liquid glue
tear & tape adhesive


How to Contact or Follow Me

Kim Tolton, Independent Stampin Up Demonstrator.
Card & Papercraft Tutorials
Please feel free to comment below, and ask away with any questions. You can also find me via the links below


Blog:

Online Store:

Stamping @ The Warren Craft Forum:

Email:
kim.tolton@googlemail.com

youTube


Pinterest:

Google +

Facebook:

Twitter:

Instagram:
@kim.tolton

LinkedIn:

Thursday, 11 August 2016

Awesome Decorative Label Grateful Bunch Rubber Stamped Handmade Card Using Stampin' Up! Products UK

So why is this card so awesome?
It is awesome as it was made by my 6 year old Granddaughter .... she picked the ink pads, cardstock, rubber stamps and everything you see. The only things she needed help with, was the ribbon and the punch. She began her crafting journey with belly painting, then she moved onto hand painting, and then onto rubber stamping.
The occasion was her Daddies Birthday ... nothing I said was going to convince her to have even the slightest bit of masculinity added into her creation.
Even the envelope got the same treatment as the card he he

I hope you find her creation just as awesome as I do?

The Stamp Set is

GRATEFUL BUNCH

From Stampin' Up!

I had completely overlooked this stamp set amongst my vast collection of stamps, but no more lol

A list of products is listed below, along with the link to my online store, should you want to browse the Catalogue, or place an order


Feel free to CASE any of my creative projects (Copy & Paste Everything)


STAMP SET
Grateful Bunch

INK PADS
Melon Mambo
old olive
Rich Razzelberry
Memento Black

CARDSTOCK

DESIGNER SERIES PAPER
Pop of Pink

PUNCHES
Blossom
Decorative Label

ACCESORIES
Melon Mambo Stitched Satin Ribbon

TOOLS
Stampin Trimmer
Paper Snips
Bone Folder
Acrylic Blocks

ADHESIVES
Tombow Multipurpose Liquid Glue
Stampin Dimensionals


How to Contact or Follow Me


Kim Tolton, Independent Stampin Up Demonstrator.
Card & Papercraft Tutorials
Please feel free to comment below, and ask away with any questions. You can also find me via the links below


Blog:

Online Store:

Stamping @ The Warren Craft Forum:

Email:
kim.tolton@googlemail.com

youTube


Pinterest:

Google +

Facebook:

Twitter:

Instagram:
@kim.tolton

LinkedIn:

Wednesday, 10 August 2016

Flowering Phrases Handmade Cards using Stampin'Up! Products UK

Welcome Back to Stamping At The Warren
Today I am sharing with you a very quick and simple One Layer Card, made using the 

FLOWERING PHRASES.STAMP SET
From Stampin Up!

I love having a variety of One Layer Cards,stashed away in a drawer, ready for those unexpected moments, when you need a card in a flask. Generally, I do not put the sentiment onto the card, until  Iam going to post or hand t the card to someone. That way, I can quickly add an appropriate Sentiment for the occasion.

Since this card has been created using one of the Bundles in Stampin' Up Catalogue, it is perfect for the complete novice, as well as seasoned crafters who just find themselves short of time.
The list of products is short too, making this a cost effective way of easing yourself into (or back into) Card Making.

Below you will find a list of the products I used for today's project, as well as a typed tutorial and Video Tutorial.

If you would like to place an order, but are uncertain about what you need, just drop me a line for a chat and assistance starting yourself with a starter kit.

Feel free to CASE any of my creative projects (Copy & Paste Everything)


PRODUCTS USED TODAY

STAMP SET
Flowering Phrases

THINLITS DIES
Flourish

INK PADS
2016 - 2018 In Colour  Ink Pads
2016 - 2018 In Colour Classic Ink Pads

CARDSTOCK
2016 - 2018 In Colour Cardstock Assorment
Whisper White

ACCESSORIES
2016 - 2016 In Colour Enamel Shapes

TOOLS
Big Shot
Magnetic or Multipurpose Platform
Stampin Trimmer
Acrylic Blocks (if you do not have wood mounted stamps)
Bone Folder
Paper Snips

ADHESIVES
Tombow Multi-Purpose Liquid Glue
Fine Tip Glue Pen

Watch the Video Below

Tutorial

  1. CARDBASE - Trim a piece of Peekaboo Peach A4 Cardstock to 30 x 10.5 cms; score long side at 14.9 cms; gold & Burnish
  2. Trim a piece of Whisper White Cardstock to 14.4 x 10.1 cms & adhere inside the card base for you to write or stamp your greeting
  3. Using the Flirty Flamingo Ink Pad, randomly stamp the card front with the large flower stamp from the Flowering Phrases Stamp Set
  4. Stamp your sentiment onto the cardfront, again using Flirty Flamingo Card-stock
  5. die cut the mosaic border die from a 2 x 14.4 cms strip of Flirty Flamingo Cardstock; adhere to the card front on the diagonal. Snip off any excess cardstock using paper snips
  6. Finish with some In Colour Enamel Shapes

How to Contact or Follow Me


Kim Tolton, Independent Stampin Up Demonstrator.
Card & Papercraft Tutorials
Please feel free to comment below, and ask away with any questions. You can also find me via the links below


Blog:

Online Store:

Stamping @ The Warren Craft Forum:

Email:
kim.tolton@googlemail.com

youTube


Pinterest:

Google +

Facebook:

Twitter:

Instagram:
@kim.tolton

LinkedIn:

Friday, 5 August 2016

Brushstrokes Flourishing phrases & Embellished Ornaments Handmade Christmas Card Stampin' Up! UK


Can you believe it is Saturday again? The weeks are flying past, and I am starting to think on the designs I will be using for this years Christmas Cards ... I Know, I can hear you groaning from here.
And for this card, I need feedback from you, my faithful followers please?

 The two cards in the photo, differ, and I want to know if you prefer the design with the leaves? or the one without the leaves?

For this design, I wanted to keep it clean, crisp, and simple 

The colour-scheme was kept equally simple, using ink pads from the Brights Colour Collection

Daffodil Delight
Old Olive
& Real Red
With Cherry Cobbler for the Card base 

It does mean I have used three stamp sets, but for me it is worth it
The background uses the Brushstrokes Stamp Set
The Flower & leaves are from the Flourishing Phrases Stamp Set
& the festive sentiment is from the Delicate Ornaments Stamp Set
Embellishment was kept equally simple with Basic Rhinestones for that Festive Twinkle.


Feel free to CASE any of my creative projects (Copy & Paste Everything)


PRODUCTS USED TODAY

STAMP SETS
BRUSHSTROKES
DELICATE ORNAMENTS
FLOURISHING PHRASES

CARDSTOCK
CHERRY COBBLER
WHISPER WHITE

INK PADS
ARCHIVAL OR MEMENTO BLACK
DAFFODIL DELIGHT
OLD OLIVE
REAL RED

ACCESSORIES
BASIC RHINESTONES

TOOLS
ACRYLIC BLOCK BUNDLE
STAMPIN TRIMMER
BONE FOLDER

ADHESIVES
TOMBOW MULTI-PURPOSE LIQUID GLUE


Tutorial

  1. CARD BASE - Trim a piece of Cherry Cobbler Cardstock to 30 x 10.5 cms; score long side at 14.9 cms; fold & Burnish
  2. Trim two pieces of Whisper White Cardstock to 14.4 x 10.1 cms; adhere one piece inside the card base for writing/stamping your greeting, I used Tombow Liquid Glue
  3. The other Whisper White Panel, begin by using the Brushstrokes Stamp Set with Daffodil Delight and stamp so the lines are horizontal to the cardstock
  4. Over stamp this with the Large flower stamp from the Flourishing Phrases Stamp Set; Stamp one using Old Olive Ink Pad, and another using the Real Red Ink Pad.
  5.  If you prefer the design with the leaves, add these in now
  6. Stamp the Sentiment from the Delicate Ornaments Stamp Set, using Archival or Memento Black
  7. Mat (layer) onto your card base and embellish with  some small Basic Rhinestones.

How to Contact or Follow Me

Kim Tolton, Independent Stampin Up Demonstrator.
Card & Papercraft Tutorials
Please feel free to comment below, and ask away with any questions. You can also find me via the links below


Blog:

Online Store:

Stamping @ The Warren Craft Forum:

Email:
kim.tolton@googlemail.com

youTube


Pinterest:

Google +

Facebook:

Twitter:

Instagram:
@kim.tolton

LinkedIn: