google-site-verification: google70410e9e92d4fda2.html
Showing posts with label scrapbooking. Show all posts

Saturday, 23 July 2016

14 Cards Making Using Project Life All Year Long Card Collection from Stampin' Up! with the Thankful Thoughts Stamp Set

I was recently running a Project Life Memory Keeping Scrapbook Class using the All Year Long Card Collection, and was left with quite a few cards. I love this card collection as it works so well with the new 2016-2018 In Colour Collection.

Anyhow, I got to thinking of creative ideas that would use up my left over cards from the pack. As a card maker by heart, I decided, that I could make some lovely quick cards with them.
Most of the cards came with sentiments already printed onto to them, Others I needed to stamp the sentiment. A couple I left blank, so I could add a sentiment at the last moment.
I added in some Basic Black Cardstock and accessories ... Stitched Ribbon, Linen Thread, Burlap Ribbon, Black Thread, doilies and Enamel Shapes

This made the cards really resourceful to make and I had great fun with it.

There are 14 cards below for you to browse, plus a video to watch.
Let me know which of the cards you like the most?

DON'T FORGET TO WATCH THE VIDEO BELOW

PRODUCTS USED TODAY

STAMP SET
THANKFUL THOUGHTS
PLAYFUL BACKGROUNDS

PROJECT LIFE CARD COLLECTION
ALL YEAR LONG

CARDSTOCK/INK PADS
2016-2018 IN COLOURS
ARCHIVAL//MEMENTO BLACK

ACCESSORIES
LINEN THREAD
BUTLAP RIBBON
STITCHED SATIN RIBBON
BLACK THREAD
REGALS ENAMEL SHAPES

ADHESIVES
TEAR & TAPE
STAMPIN DIMENSIONALS
TOMBOW MULTIPURPOSE LIQUID GLUE
MINI GLUE DOTS


TOOLS
STAMPIN TRIMMER
PAPER SNIPS
BONE FOLDER


Feel free to CASE any of my creative projects (Copy & Paste Everything)


Watch the Video Below


How to Contact or Follow Me


Kim Tolton, Independent Stampin Up Demonstrator.
Card & Papercraft Tutorials
Please feel free to comment below, and ask away with any questions. You can also find me via the links below


Blog:

Online Store:

Stamping @ The Warren Craft Forum:

Email:
kim.tolton@googlemail.com

youTube


Pinterest:

Google +

Facebook:

Twitter:

Instagram:
@kim.tolton

LinkedIn:

Wednesday, 22 June 2016

Fairy Celebration Watercolour Double Diamond Fold Card Stampin' Up! UK

Today, I wanted to share with you, this card that I made for my Daughter & her Partner, as they are moving into their first home together today!
My daughter loves anything crafty, vintage and handmade, so I wanted the card to be something a little bit different. 
I chose the Fairy Celebration Stamp Set
Because Toadstools and Fairies  represent Home to me

So I hope that they enjoy this Double Diamond Fold Card


·        
Feel free to CASE any of my creative projects (Copy & Paste Everything)


PRODUCTS USED

STAMP SET
FAIRY CELEBRATION

CARDSTOCK
THICKER WHISPER WHITE
SHIMMERY WHITE
MINT MACRON

INK PADS
DAFFODIL DELIGHT
OLD OLIVE
REAL RED
BERMUDA BAY
BLUSHING BRIDE
SWEET SUGARPLUMB
SOFT SUEDE
BASIC BLACK

ACCESSORIES
SUBTLES ENAMEL SHAPES

TOOLS
STAMPIN TRIMMER
SCORING TOOL
METRIC SCORING BOARD (OPTIONAL)
DIAGONAL SCORING PLATE (OPTIONAL)
BONEFOLDER
AQUAPAINTER
PAPER SNIPS

ADHESIVES
TOMBOW MULTI-PURPOSE LIQUID GLUE


Tutorial

  1. Trim a piece of Thicker Whisper White Cardstock to 20 x 20 cms (8" x 8")
  2. Score the cardstock at 10 cms; rotate by 45 degrees  and repeat (4", rotate by 45 degrees and repeat)
  3. Score on the diagonal, rotate by 45 degrees and repeat
  4. Using Paper Snips, cut away the bottom right 10 x 10 cms square (4" x 4")
  5. Fold and burnish all score lines. To fold up the box, you will need to create mountain & Valley folds.
  6. Trim a TWO pieces of Shimmery White Cardstock to 9.2 x 9.2 cms, and stamp the art pieces of your choice onto these (including the sentiment) using Archival Basic Black Ink Pad.
  7. Colour in the art pieces using ink lifted from the 'well' of the ink pads (squish the ink pads together to transfer ink from the pad to the well). Do not apply excessive amounts of water or the cardstock with wrinkle.
  8. Mat your art pieces onto Mint Macaron Cardstock measuring 9.6 x 9.6 cms
  9. Stamp the reverse side of the cardstock with the small fairy, & the fairy & the Fairy dust Stamp using Archival Black Ink

How to Contact or Follow Me


Kim Tolton, Independent Stampin Up Demonstrator.
Card & Papercraft Tutorials
Please feel free to comment below, and ask away with any questions. You can also find me via the links below


Blog:

Online Store:

Stamping @ The Warren Craft Forum:

Email:
kim.tolton@googlemail.com

youTube


Pinterest:

Google +

Facebook:

Twitter:

Instagram:
@kim.tolton

LinkedIn:

Friday, 17 June 2016

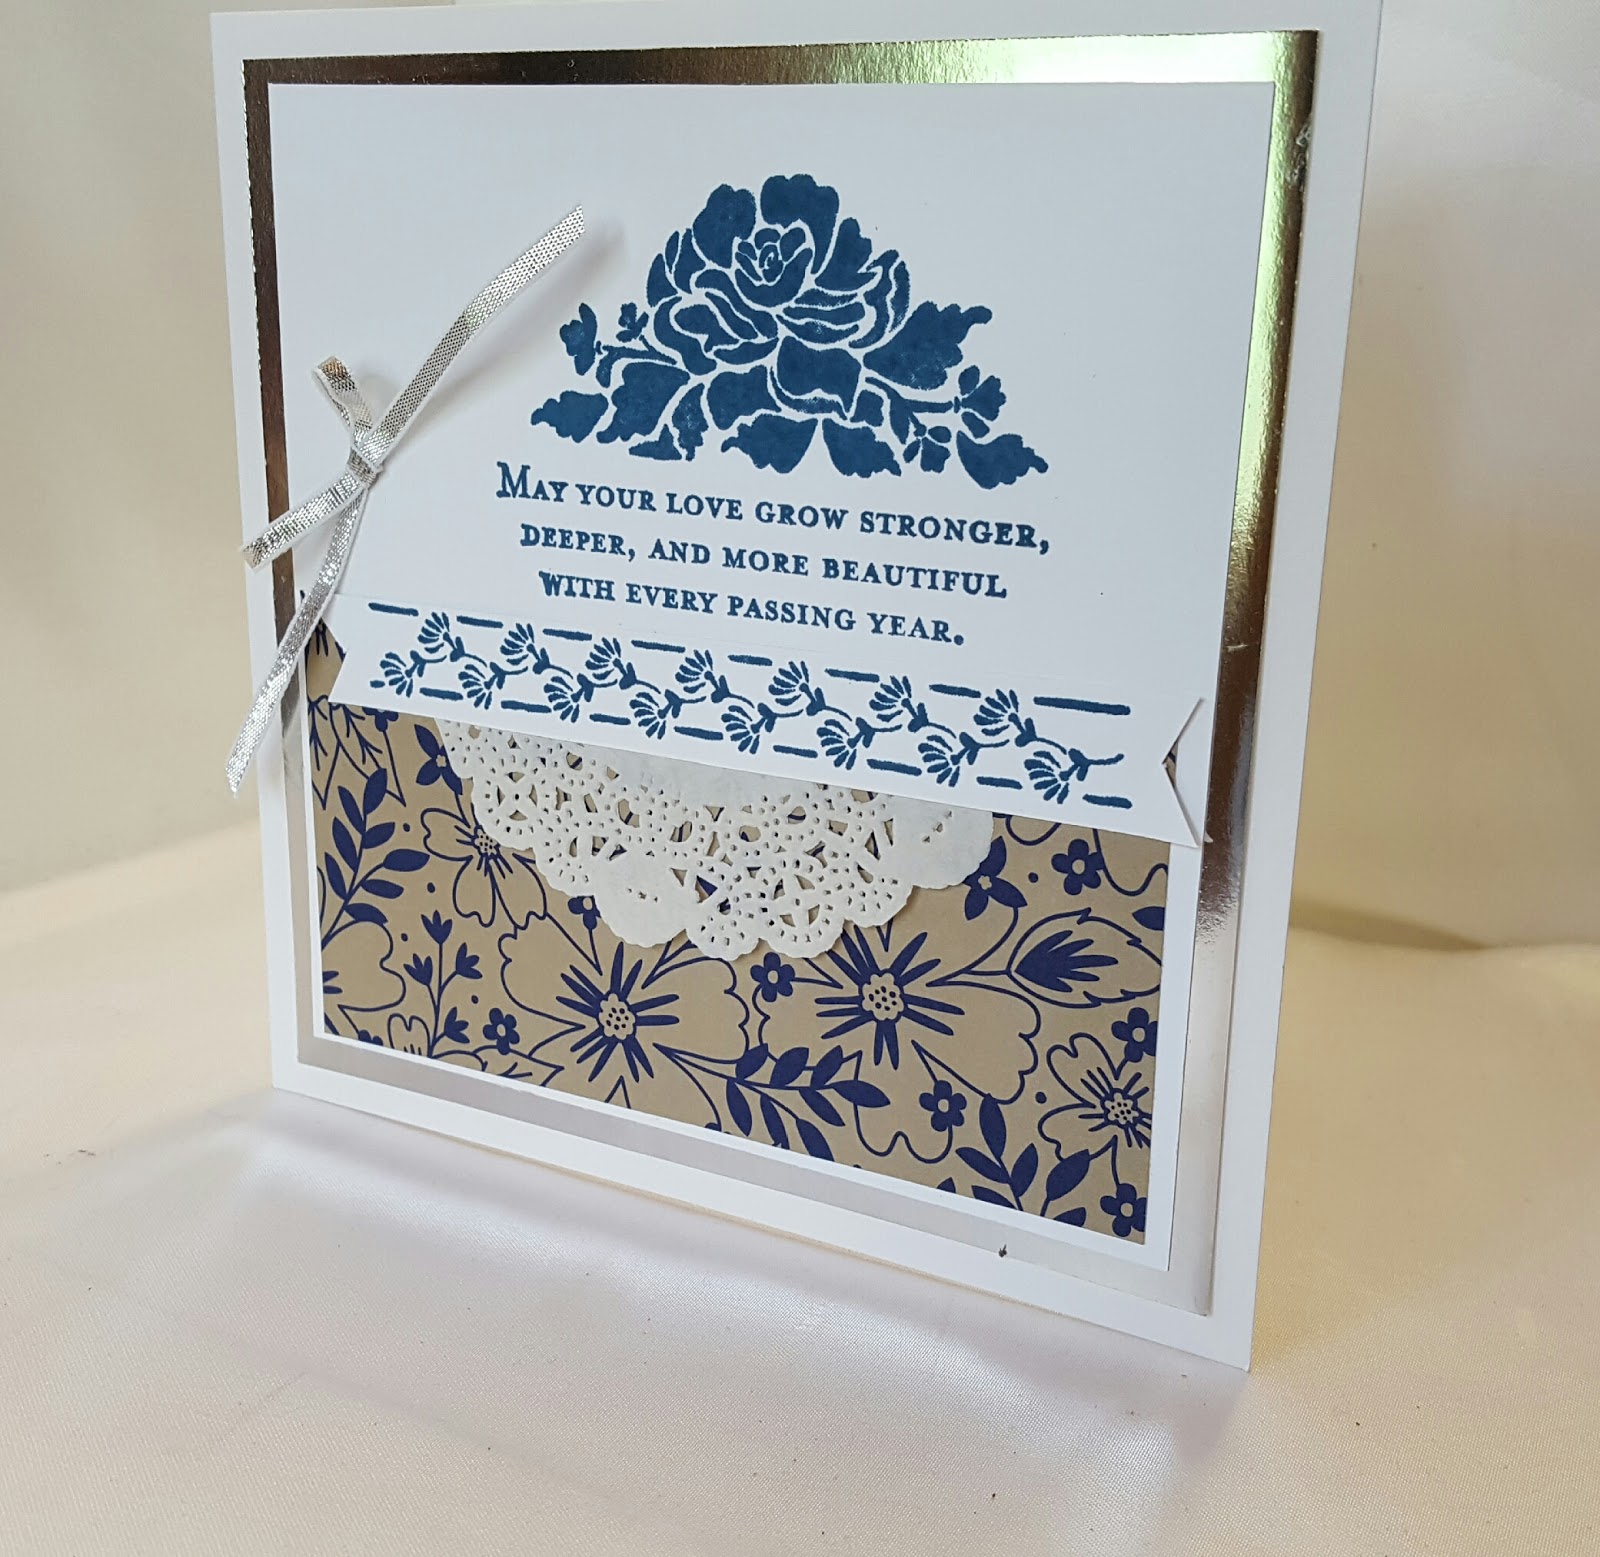
Floral Phrases Dapper Denim & Silver Foil Anniversary Card Stampin' Up! UK

It was my middle sons 2nd Wedding Anniversary this week, and I knew exactly which Stamp Set I was going to use ... and that would be 

FLORAL PHRASES

This is one of the stamp sets new to this years Annual Catalogue, and I fell in love with it, the moment I set eyes on it. And of course, I just HAD to HAVE it he he

I went with Dapper Denim, just because I adore this warm Blue. Blue's have a tendency to be a little cool, but not this one. It sits nicely between Night of Navy and Marina Mist.

I coupled it with this Dapper Denim paper from the Affectionately Yours Suite, as it co-ordinates so well with today's colour scheme, and really sets off the Silver Foil Mat.
The Doily  gives extra interest, and I stamped the floral accent onto onto a long narrow banner that I popped up on Stampin Dimensionals to give some added lift, and finished with some Silver Ribbon.
Tutorial is below


Feel free to CASE any of my creative projects (Copy & Paste Everything)


STAMP SET
FLORAL PHRASES

CARDSTOCK
THICKER WHISPER WHITE
SILVER FOIL

INK PADS
DAPPER DENIM

ACCESSORIES
1/8" SILVER RIBON
DELICATE WHITE DOILY

DESIGNER SERIES PAPER
AFFECTIONATELY YOURS

TOOLS
STAMPIN TRIMMER
ACRYLIC BLOCK BUNDLE
BONE FOLDER
PAPER SNIPS

ADHESIVES
FAST FUSE
STAMPIN DIMENSIONALS
MINI GLUE DOTS

 The beauty of Stampin' Up!'s range of products, is that it is fully co-ordinated, and their range of ink pads, cardstock etc, is so wide , that you could make this card in any colour-scheme you or your customer wants ... what more could you want?
Just make sure to follow Stampin' Up!s Angel Policy
so take a peek at the BETTER THAN EMAIL Stamp Set whilst browsing my online store...

Tutorial

  1. Trim a piece of Thicker Whisper White Cardstock to 15 x 30 cms (6" sq)'; Score at 15 cms; fold & Burnish
  2. Trim a piece of Silver Foiled Cardstock to 14 x 14 cms
  3. Trim a piece of regular Whisper White Cardstock to 13.4 x 13.4 cms
  4. Trim a piece of Affectionately Yours Designer Series Paper to 13 x 4 cms and adhere to the lower section of the Whisper White Cardstock
  5. Trim a piece of Delicate White Doily and mount over the Designer Series Paper
  6. Using Dapper Denim Ink Pad, and the Large Floral Stamp, Stamp the art piece to the upper portion of the cardstock
  7. Stamp the Floral Flourish stamp into a scrap of Whisper White Cardstock measuring 13 x 2 cms, and using Paper Snips, create Banner Ends, add Stampin Dimensionals to the back and mount on the card front so it overlaps the doily
  8. Finally, add a silver ribbon bow

How to Contact or Follow Me


Kim Tolton, Independent Stampin Up Demonstrator.
Card & Papercraft Tutorials
Please feel free to comment below, and ask away with any questions. You can also find me via the links below


Blog:

Online Store:

Stamping @ The Warren Craft Forum:

Email:
kim.tolton@googlemail.com

youTube


Pinterest:

Google +

Facebook:

Twitter:

Instagram:
@kim.tolton

LinkedIn:

Monday, 13 June 2016

Artistically Asian meets Layering Love with & Affectionately Yours Stampin' Up! UK

Well, it is a bit of Miserable Monday here in wet Essex. The heavens well and truly opened, along with a good old time of Thunder & Lightening

But have I let it stop me from getting into my workshop?
Oh No!

And so today, I have a bit of an eclectic mix of stamp sets from the new Stampin' Up! Annual Catalogue for you, in today's One Layer card creation.
The joy of One Layer Cards is that they are super quick to make!
Perfect for those short notice cards that you need in a hurry!


·        
Feel free to CASE any of my creative projects (Copy & Paste Everything)

& HERE IS A LIST OF THE ITEMS USED

STAMP SETS
Artistically Asian
Layering Love

CARDSTOCK
Mint Macaron

INK PADS
Dapper Denim
Mint Macaron

DESIGNER SERIES PAPER
Affectionately Yours (foiled floral)

ACCESSORIES
Gold Sequin Trim
Melon Mambo Thicker Bakers Twine

ADHESIVES
Fine Tip Glue Pen
Fast Fuse
Mini Glue Dots

TOOLS
Stampin Trimmer
Acrylic Block Bundle

Tutorial

  1. Trim an A4 piece of Mint Macaron Cardstock to 3. x 10.5 cms; score at 14.8 cms; fold & Burnish (A6 Card Base)
  2. Using the Mint Macaron Ink Pad, randomly stamp a portion of the card front with the Acer leaf stamp from Artistically Asian Stamp Set (gives a tone on tine effect)
  3. Trim a strip of the foiled floral paper in the Affectionately Yours Designer Series Paper Pack to 10.5 x 1.5 cms, and attach to the lower segment of the card front using Fast Fuse Adhesive
  4. Stamp the sentiment of your choice from the Layering Love Stamp Set and stamp directly onto the card front using Dapper Denim Ink Pad
  5. Remove a few gold sequins from the roll of  Sequin Trim. and adhere to the card front using the Fine Tip glue Pen
  6. Finish with a small bow of Melon Mambo Thicker Bakers Twine & Attach to the card front with a Mini Glue Dot

How to Contact or Follow Me


Kim Tolton, Independent Stampin Up Demonstrator.
Card & Papercraft Tutorials
Please feel free to comment below, and ask away with any questions. You can also find me via the links below


Blog:

Online Store:

Stamping @ The Warren Craft Forum:

Email:
kim.tolton@googlemail.com

youTube


Pinterest:

Google +

Facebook:

Twitter:

Instagram:
@kim.tolton

LinkedIn:

Wednesday, 24 February 2016

Perfectly Artistic Greatest Greetings Explosion Box Stampin Up! UK Part Two

And very Quickly, today is Part Two of my Explosion Box How To Tutorial using the Corner Trio Punch and the Perfectly Artistic Sale A Bration Designer Series Papers (DSP)

I have repeated the tutorial below, and the Part Two Video so you can see  how I assembled and decorated the box.

_________________________________________________________________
__________________________________________
As you scroll down today's blog post, you will find :

  • icons of all the products used to create today's card - click on them to visit my online store;
  • A Video Tutorial
  • & a typed tutorial
Feel free to CASE any of my creative projects (Copy & Paste Everything)


Click on the icons below to view/order any of the products used in today's tutor


Watch the Video Below

Table built using Product Table Builder by The Crafty Owl - Independent Stampin' Up! Demonstrator.
Tutorial

  1.  LID Trim a piece of cardstock to 15 x 15 cms; score on all sides at 2.5 cms; Fold & Burnish all score lines; Notch out 4 corners notch out the 4 corners & adhere kid corners using Tombow Liquid Glue; Trim Designer Series Paper to:

  • Four pieces measuring 9.5 x 2 cms
  • One piece measuring 9.5 x 9.5 cms; & adhere to lid.


1.  2. LARGE LAYER - Trim a piece of 12" cardstock to 30 x 30 cms (12" x 12"); score at 10 & 20 cms; rotate by 45 degrees and score again at 10 & 20 cms; using Kraft Scissors, remove the four outer corners, following the score lines, so you are left with a cross shaped piece of cardstock; fold & burnish all the score lines; 

3.  MIDDLE LAYER - Trim a piece of cardstock to 27 x 27 cms; score at 9 & 18 cms; Rotate by 45 degrees & score at 9 & 18 cms fold & Burnish; Cut out the 4 corners to create a cross shape; Trim the following pieces of Designer Series Paper:

  • Four pieces measuring 8.5 x 8.5
  • Four pieces measuring 8.5 x 8.5 (contrast) & adhere to the middle layer.
4.  SMALL LAYER - Trim a piece of Cardstock to 24 x 24 cms; score at 8 & 16 cms; Rotate by 45 degrees and score at 8 & 16 cms; cut out the 4 outside corners
Fold & Burnish & attach to the cardstock Trim the following pieces of Designer Series Paper to;
  • Five pieces measuring  5.5 x 5.5 cms
  • Four pieces measuring 5.5 x 5.5 cms (contrast)


How to Contact or Follow Me


Kim Tolton, Independent Stampin Up Demonstrator.
Card & Papercraft Tutorials
Please feel free to comment below, and ask away with any questions. You can also find me via the links below


Blog:

Online Store:

Stamping @ The Warren Craft Forum:

Email:
kim.tolton@googlemail.com

youTube


Pinterest:

Google +

Facebook:

Twittert:

Instagram:
@kim.tolton

LinkedIn: