
First I am going to be sharing the new In Colours from Stampin Up! & I Just know you are going to LOVE them!!
Then I am going to share with you the Video from Stampin Up!'sOn Stage Live Event in Telford, UK a couple of weeks back.
And Finally, I am going to share with you a typed & Video'd Tutorial on a Sneak Peak Butterfly Card I made using products from the new Affectionately Your's Suite .
Now that should be enough to keep you going for a day or two he he
So let's get going with the
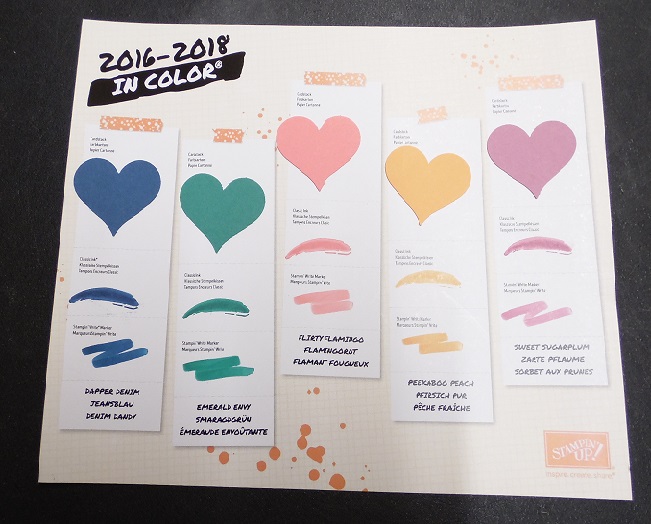
new 2016 to 2018 In Colour Collection
And here they are. I love these new colours, as they are fresh, clean and remind me that it is Spring.
So from Left to Right we have
Dapper Denim, Emerald Envy; Flirty Flamingo; Peakabo Peach & Sweet Sugarplum
The names are almost good enough to eat, don't you think?
I would love to hear from you, and let me know which colours are your favourite? & Why?
Next, I am going to share with you some of the madness that is a Stampin Up! Event., They are always full of drum rolls, cheers, Prize Patrols, Make & Takes and product givaways. It is also a chance to meet up with other Demonstrators., since we are a large family of it's own, that always welcomes new Demonstrators. Recognition is given to Demonstrators achieving milestones, and get to see examples of new catalogue products, and get swaps from the other attending demonstrators, to help us with workshop ideas when time is short, or those horrible moments, when creativity fails.
The video below, is the one from Salt Lake City, since we had a Live Link between Telford and Salt Lake City for a good few hours in the day, so we all got to share at the same time. I hope you enjoy it?
Finally, here is your Sneak Peak
This lovely Butterfly card has been made using
The Affectionately Yours Florals & Copper Suite of Products.
What does this mean?
Well, if you are familiar with Stampin Up! Catalogues, you will have noticed that in the current Spring/Summer Seasonal Catalogue, that there are a couple of Suites in there
So what is a Suite? A Suite is a range of co-ordinating products that work beautifully together.
In this Suite you can choose The Affectionately Yours Specialty Designer Series Paper (which includes 2 foiled papers)
Affectionately Yours Designer Washi Tape
Affectionately Yours Cardstock Pack
Floral Affection Textured Impressions Embossing Folder
& the Floral Affection Stamp Set
Copper Embossing Powder

And here is how I made this lovely card:
Trim a piece of Thicker Whisper White Cardstock to 30 x 10.5 cms, score at 14.8 cms; fold & Burnish
- Trim a piece of Colour Me Irresistible Designer Series Paper to 14,4 x 10.1 cms
- Using Flirty Flamingo Ink Pad and a wedge of Stampin Sponge, Sponge the paper, adding ink to creating a graduated ombre effect
- Trim a piece of Dapper Denim Cardstock to 10 x 5 cms; and a piece of Flirty Flamingo Cardstock to 10 x 5 cms. Create Banner Ends using the Triple Banner Punch
- Trim a piece of Affectionately Yours Designer Series Paper to 8 x 2.5 cms, and create a banner end, again using the Triple Banner Punch.
- Adhere the Dapper Denim Banner just off centre of the mid line using Fast Fuse or Tombow; then adhere the Flirty Flamingo Banner using Stampin Dimensionals to pop it up, overlapping the first Banner; and then mount the Designer Series Paper Banner, overlapping the two banners already stuck down.
- Make a bow with long tails, using Thicker Melon Mambo Bakers Twine & adhere to the top of the banners using a Glue Dot
- Using the Copper Foiled Paper from the Affectionately Yours DSP Pack, and die cut a large butterfly, using the Butterfly Thinlits Dies, & run through your Big Shot with a Magnetic Platform for best effects.
- Attach the butterfly using a Stampin Dimensional , placing the butterfly over the banners, gently folding up the wings; Add a Metal Rimmed Pear to the centre of the butterfly.
- Finally, stamp your Birthday Sentiment from the And Many More stamp set using Dapper Denim Ink Pad onto a 1.5 cm strip of Whisper White or Shimmery White Cardstock; create banner ends using the Banner Punch, Guiding the cardstock in through the top of the punch, and between the cutting blades.
 |  |  |  |  |  |  |
 |  |  |  |  |  |  |
 |  |  |  |  |  |
Table built using Product Table Builder by The Crafty Owl - Independent Stampin' Up! Demonstrator.
Watch the Video Tutorial

How to Contact or
Follow Me
Kim Tolton, Independent Stampin Up Demonstrator.
Card & Papercraft Tutorials
Please feel free to comment below, and ask away with any questions. You
can also find me via the links below
Blog:
Online Store:
Stamping @ The Warren Craft Forum:
Email:
kim.tolton@googlemail.com
| | | | | | |
| | | | | | |
| | | | | |
Table built using Product Table Builder by The Crafty Owl - Independent Stampin' Up! Demonstrator.
youTube
Pinterest:
Google +
Facebook:
Twittert:
Instagram:
@kim.tolton
LinkedIn:
No comments:
Post a Comment