google-site-verification: google70410e9e92d4fda2.html
Showing posts with label Masking. Show all posts

Friday, 26 August 2016

Flower Shop Masked Watercolour Technique with One Big Meaning Thank Handmade Thank You Card Using Stampin' Up! Products UK


Today's card is a great way to start with Masking & Watercolour Techniques, on this Flower Shop Thank You Card.
There is no need to buy watercolour paper, but if you have it, then use it.
In my o photo above, I have used a piece of Whisper White Cardstock, and works well, so long as you don't get the cardstock really well.
You will need  an Archival ink pad or a Stazon Ink Pad, as this prevents the inks leaching out when you begin watercolouring, Plus an aquapainter Brush
For the watercolouring, I I used Archival Gray, to give an almost invisible outline to the flowers.
I used ink pads from the Regals Colour Collection, to keep the project co-ordinated.

Masking is a way of rubber stamping,  that doesn't have any overlapping of the images. You start from the foreground and work backward masking off each flower in turn, before stamping the next image.

To make a mask is super simple.
Take a Post It Note, and stamp your image onto the note, ensuring some of the stamped image is over the area of sticky (i.e. you stamp on the front of the note); then use paper snips to cut around the image so you are left with an outline of the glower, and a small strip if sticky on the back.

To build the card, stamp your first flower & once dry, cover the flower with the mask. Stamp your next flower, remove the mask, and repeat with each flower until you have the effect you want, leaving space for the sentiment

To watercolour, select your ink pads, and if you are using Stampin Up Classic Ink Pads, all you do is squidge the ink pad firmly to transfer ink from the pad to the 'well'. Then you pop a single drop of water into the well by gently squeezing the aquapainter, from there you can start painting.

If the aquapainter gets too wet, dry it on a piece of kitchen towel.
I used dilute Crushed Curry Ink to add highlights around some of the flowers, and on a scrap of white cardstock, and painted as above, this was then punched out using the Pansy Punch, and added to the card front using Stampin Dimensionals.
Allow the cardstock to dry thoroughly before stamping your sentiment and mounting onto your card base. 
Finish with a flourish of Rhinestones

Below the photo, you will find the cardstock dimensions and a list (with product codes)  of all the products used today, along with a link to my online store
Feel free to CASE any of my creative projects (Copy & Paste Everything)


  • CARDBASE - Always Artichoke measuring 30 x 10.5 cms; score long side at 14.9 cms; fold & Burnish
  • FRONT PANEL - Whisper White measuring 14.4 x 10.1 cms
  • INSIDE PANEL - Whisper White measuring 14.4 x 10.1 cms
  • Scrap of Whisper White Cardstock to stamp & Punch the additional flower 

PRODUCTS USED TODAY
STAMP SETS
Flower Shop - 130942
One Big Meaning - 139420
INK PADS
Archival Basic Black - 140931
Archival Basic Gray - 140932
Crushed Curry - 131173
Elegant Eggplant - 126969
Island Indigo -126986
Rose Red - 126954
Perfect Plumb - 126963
CARDSTOCK
Always Artichoke - 108610
Whisper White  - 106549
ACCESSORIES
Basic Rhinestones - 119246
PUNCH
Pansy - 130968
ADHESIVES
Stampin Dimensionals - 104430
Multipurpose liquid glue - 110755
TOOLS
Stampin Trimmer - 129722
Bone Folder - 102300
Paper Snips - 103579
Acrylic Block C - 118486
Acrylic Block H - 118490
Aqua Painter - 103954


How to Contact or Follow Me

Kim Tolton, Independent Stampin Up Demonstrator.
Card & Papercraft Tutorials
Please feel free to comment below, and ask away with any questions. You can also find me via the links below


Blog:

Online Store:

Stamping @ The Warren Craft Forum:

Email:
kim.tolton@googlemail.com

youTube


Pinterest:

Google +

Facebook:

Twitter:

Instagram:
@kim.tolton

LinkedIn:

Sunday, 31 July 2016

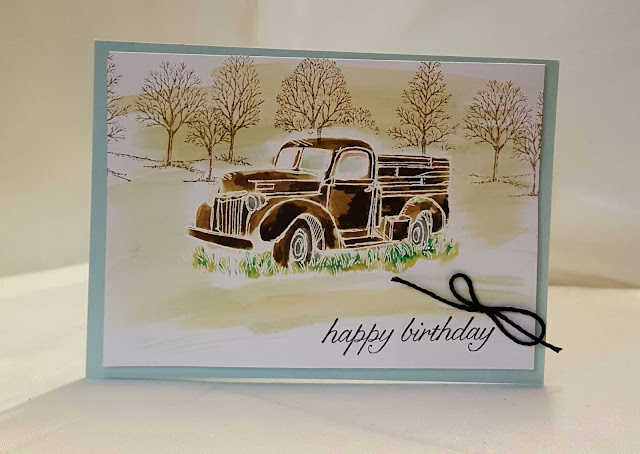
Build A Masculine Birthday with Country Living & Masked Watercolour Technique with Stampin' Up! Products


Well I have just got back from walking the dogs over the park with my husband. An outing we regularly make at weekends that I look forward to.
Now that I am home I can get share with you today's card, inspired by the park where we walk the dogs.
This particular card is for my son's 32nd Birthday next week.

It combines three of my favourite Paper Craft Techniques

EMBOSS RESIST
WATERCOLOUR
& MASKING

Below, you will find not just today's tutorial, but also the accompanying YouTube video

I have also included a list of all the products used today & the link for my online store where you can view or purchase your Craft Supplies

Feel free to CASE any of my creative projects (Copy & Paste Everything)


TODAY'S PRODUCTS

STAMP SETS
BUILD A BIRTHDAY
COUNTRY LIVIN
LOVELY AS A TREE

INK PADS
VERSAMARK
SOFT SUEDE
CHOC CHIP
EARLY ESPRESSO
CUCUMBER CRUSH
EMERALD ENVY

CARDSTOCK
SOFT SKY
WHISPER WHITE

EMBOSSING POWDER
CLEAR

ACCESORIES
SOLID BAKERS TWINE

TOOLS
HEAT TOOL
EMBOSSING BUDDY
AQUAPAINTER
STAMPIN TRIMMER
ACRYLIC BLOCK BUNDLE
PAPER SNIPS
BONE FOLDER


STAMPIN WRITE MARKERS
EARLY ESPRESSO
BASIC GREY
BASIC BLACK

ADHESIVES
TOMBOW MULTIPURPOSE LIQUID GLUE
MINI GLUE DOTS


Watch the Video Below

Tutorial

  1. CARD BASE - Trim a piece of Soft Sky Cardstock to 30 x cms 10.5 cms; score long side @14.9 cms; fold & burnish
  2. Trim a piece of Whisper White Cardstock to 14 x 10.1 cms
  3. Make a Mask of the Truck, by stamping the truck image onto a large Pot it Note, ensuring part of the image is stamped over where the sticky strip is. Cut out the image, place to one side.
  4. Wipe the surface of the whisper White panel with the Embossing Buddy, to remove static from the card
  5. clean the truck stamp and stamp the truck onto the Whisper White Panel toward the lower segment of the Whisper White panel using VERSAMARK ink; dust with clear embossing powder; remove the excess powder. & heat set
  6. Be sure you do not get the cardstock too wet.
  7. Using the Aquapainter, pick up ink from the well of the Soft suede ink pad, and add the paint to the truck Allow to dry
  8. Next, add highlights and definition to the image, using the Chocolate Chip Ink Pad, picking up ink with the aquapainter as before. Allow to dry
  9. Using the Cucumber Crush Ink Pad, add detail to the grass area beneath the truck using the aquapainter; then go over the top of this with Emerald Envy to add definition 
  10. add a drop of water into the well of the Emerald Envy Ink Pad, and give a watercolour wash to the foreground, background and windows. Allow to dry completely
  11. Place the Mask over the image of the Truck,; using the Early Espresso Ink Pad, Stamp your sentiment & then Stamp the Lovely As A Tree Image twice, one being slightly higher than the other to add depth
  12. Remove the mask; Mat the panel onto the Card Base using Tombow; & finish with a bow of Solid Bakers Twine (i.e. single colour).

How to Contact or Follow Me


Kim Tolton, Independent Stampin Up Demonstrator.
Card & Papercraft Tutorials
Please feel free to comment below, and ask away with any questions. You can also find me via the links below


Blog:

Online Store:

Stamping @ The Warren Craft Forum:

Email:
kim.tolton@googlemail.com

youTube


Pinterest:

Google +

Facebook:

Twitter:

Instagram:
@kim.tolton

LinkedIn:

Saturday, 30 July 2016

Wherever You Go Guy Greeting Masculine Birthday Card using Stampin' Up! Products UK

Today I have a Masking Technique to create the Sky Background to this Masculine Card.
The Wherever You Go Stamp Set, is another of the great collage stamp sets in the new Catalogue. Most (but not all) of the collage stamp sets, including this one, don't have sentiment Stamps in the set.
So I used the Guy Greetings Stamp Set to get the Birthday Sentiment, that was then die cut and popped up on Stampin Dimensionals for added depth. The new Burlap Ribbon is fab, and super for masculine projects.

Feel free to CASE any of my creative projects (Copy & Paste Everything)


PRODUCTS USED

STAMP SETS
WHEREVER YOU GO
GUY GREETINGS

INK PADS
ARCHIVAL BLACK
ARCHIVAL GREY
POOL PARTY
CALYPSO CORAL

CARDSTOCK
BASIC BLACK
WHISPER WHITE

FRAMELITS DIES
LOTS OF LABELS
LAYERING OVALS

ACCESSORIES
BURLAP RIBBON

TOOLS
STAMPIN TRIMMER
BIG SHOT
MAGNETIC PLATFORM
PAPER SNIPS
BONE FOLDER

ADHESIVES
TOMBOW MULTIPURPOSE LIQUID GLUE
STAMPIN DIMENSIONALS
TEAR & TAPE
MINI GLUE DOTS
Tutorial

  1. CARD BASE - Trim a piece of Basic Black Cardstock to 30 x 10.5 cms; score long side at 14.9 cms; fold & Burnish
  2. Die Cut a Scallop Oval to use as a mask; 
  3. Using a wedge of a Stampin Sponge, and Pool Party Ink Party Ink Pad,  begin creating your sky. Start in one of the top corners of a piece of Whisper White Cardstock measuring 14 x 10.5 cms; place down the mask and sponge with the ink, move the mask a little, and repeat, Continue moving and sponging across 2/3 of the cardstock has sky. Overlap the mask in places to give depth of colour
  4. Over-stamp the Background with the Bridge Stamp using Archival Grey Ink Pad.
  5. Stamp some Birds using Archival Grey Ink
  6. Ink Up the Starburst Stamp using Calypso Coral Ink Pad.
  7. Stamp the Birthday Sentiment using Archival / Memento Black Ink & Die Cut using the Lots of Labels Framelits Dies
  8. Cyt a length of Burlap Ribbon in half length ways and add to the base of the card front using Tear & Tape Adhesive; Finish by tying a bow with the other piece of Burlap Ribbon and add to the card fromt

How to Contact or Follow Me


Kim Tolton, Independent Stampin Up Demonstrator.
Card & Papercraft Tutorials
Please feel free to comment below, and ask away with any questions. You can also find me via the links below


Blog:

Online Store:

Stamping @ The Warren Craft Forum:

Email:
kim.tolton@googlemail.com

youTube


Pinterest:

Google +

Facebook:

Twitter:

Instagram:
@kim.tolton

LinkedIn: