google-site-verification: google70410e9e92d4fda2.html

Sunday 31 July 2016

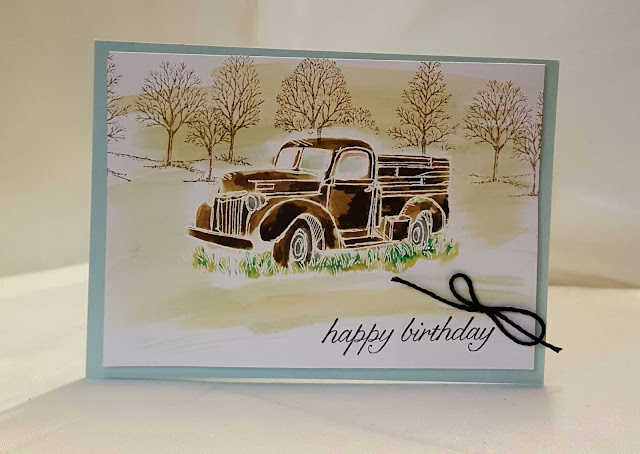
Build A Masculine Birthday with Country Living & Masked Watercolour Technique with Stampin' Up! Products


Well I have just got back from walking the dogs over the park with my husband. An outing we regularly make at weekends that I look forward to.
Now that I am home I can get share with you today's card, inspired by the park where we walk the dogs.
This particular card is for my son's 32nd Birthday next week.

It combines three of my favourite Paper Craft Techniques

EMBOSS RESIST
WATERCOLOUR
& MASKING

Below, you will find not just today's tutorial, but also the accompanying YouTube video

I have also included a list of all the products used today & the link for my online store where you can view or purchase your Craft Supplies

Feel free to CASE any of my creative projects (Copy & Paste Everything)


TODAY'S PRODUCTS

STAMP SETS
BUILD A BIRTHDAY
COUNTRY LIVIN
LOVELY AS A TREE

INK PADS
VERSAMARK
SOFT SUEDE
CHOC CHIP
EARLY ESPRESSO
CUCUMBER CRUSH
EMERALD ENVY

CARDSTOCK
SOFT SKY
WHISPER WHITE

EMBOSSING POWDER
CLEAR

ACCESORIES
SOLID BAKERS TWINE

TOOLS
HEAT TOOL
EMBOSSING BUDDY
AQUAPAINTER
STAMPIN TRIMMER
ACRYLIC BLOCK BUNDLE
PAPER SNIPS
BONE FOLDER


STAMPIN WRITE MARKERS
EARLY ESPRESSO
BASIC GREY
BASIC BLACK

ADHESIVES
TOMBOW MULTIPURPOSE LIQUID GLUE
MINI GLUE DOTS


Watch the Video Below

Tutorial

  1. CARD BASE - Trim a piece of Soft Sky Cardstock to 30 x cms 10.5 cms; score long side @14.9 cms; fold & burnish
  2. Trim a piece of Whisper White Cardstock to 14 x 10.1 cms
  3. Make a Mask of the Truck, by stamping the truck image onto a large Pot it Note, ensuring part of the image is stamped over where the sticky strip is. Cut out the image, place to one side.
  4. Wipe the surface of the whisper White panel with the Embossing Buddy, to remove static from the card
  5. clean the truck stamp and stamp the truck onto the Whisper White Panel toward the lower segment of the Whisper White panel using VERSAMARK ink; dust with clear embossing powder; remove the excess powder. & heat set
  6. Be sure you do not get the cardstock too wet.
  7. Using the Aquapainter, pick up ink from the well of the Soft suede ink pad, and add the paint to the truck Allow to dry
  8. Next, add highlights and definition to the image, using the Chocolate Chip Ink Pad, picking up ink with the aquapainter as before. Allow to dry
  9. Using the Cucumber Crush Ink Pad, add detail to the grass area beneath the truck using the aquapainter; then go over the top of this with Emerald Envy to add definition 
  10. add a drop of water into the well of the Emerald Envy Ink Pad, and give a watercolour wash to the foreground, background and windows. Allow to dry completely
  11. Place the Mask over the image of the Truck,; using the Early Espresso Ink Pad, Stamp your sentiment & then Stamp the Lovely As A Tree Image twice, one being slightly higher than the other to add depth
  12. Remove the mask; Mat the panel onto the Card Base using Tombow; & finish with a bow of Solid Bakers Twine (i.e. single colour).

How to Contact or Follow Me


Kim Tolton, Independent Stampin Up Demonstrator.
Card & Papercraft Tutorials
Please feel free to comment below, and ask away with any questions. You can also find me via the links below


Blog:

Online Store:

Stamping @ The Warren Craft Forum:

Email:
kim.tolton@googlemail.com

youTube


Pinterest:

Google +

Facebook:

Twitter:

Instagram:
@kim.tolton

LinkedIn:

Saturday 30 July 2016

Wherever You Go Guy Greeting Masculine Birthday Card using Stampin' Up! Products UK

Today I have a Masking Technique to create the Sky Background to this Masculine Card.
The Wherever You Go Stamp Set, is another of the great collage stamp sets in the new Catalogue. Most (but not all) of the collage stamp sets, including this one, don't have sentiment Stamps in the set.
So I used the Guy Greetings Stamp Set to get the Birthday Sentiment, that was then die cut and popped up on Stampin Dimensionals for added depth. The new Burlap Ribbon is fab, and super for masculine projects.

Feel free to CASE any of my creative projects (Copy & Paste Everything)


PRODUCTS USED

STAMP SETS
WHEREVER YOU GO
GUY GREETINGS

INK PADS
ARCHIVAL BLACK
ARCHIVAL GREY
POOL PARTY
CALYPSO CORAL

CARDSTOCK
BASIC BLACK
WHISPER WHITE

FRAMELITS DIES
LOTS OF LABELS
LAYERING OVALS

ACCESSORIES
BURLAP RIBBON

TOOLS
STAMPIN TRIMMER
BIG SHOT
MAGNETIC PLATFORM
PAPER SNIPS
BONE FOLDER

ADHESIVES
TOMBOW MULTIPURPOSE LIQUID GLUE
STAMPIN DIMENSIONALS
TEAR & TAPE
MINI GLUE DOTS
Tutorial

  1. CARD BASE - Trim a piece of Basic Black Cardstock to 30 x 10.5 cms; score long side at 14.9 cms; fold & Burnish
  2. Die Cut a Scallop Oval to use as a mask; 
  3. Using a wedge of a Stampin Sponge, and Pool Party Ink Party Ink Pad,  begin creating your sky. Start in one of the top corners of a piece of Whisper White Cardstock measuring 14 x 10.5 cms; place down the mask and sponge with the ink, move the mask a little, and repeat, Continue moving and sponging across 2/3 of the cardstock has sky. Overlap the mask in places to give depth of colour
  4. Over-stamp the Background with the Bridge Stamp using Archival Grey Ink Pad.
  5. Stamp some Birds using Archival Grey Ink
  6. Ink Up the Starburst Stamp using Calypso Coral Ink Pad.
  7. Stamp the Birthday Sentiment using Archival / Memento Black Ink & Die Cut using the Lots of Labels Framelits Dies
  8. Cyt a length of Burlap Ribbon in half length ways and add to the base of the card front using Tear & Tape Adhesive; Finish by tying a bow with the other piece of Burlap Ribbon and add to the card fromt

How to Contact or Follow Me


Kim Tolton, Independent Stampin Up Demonstrator.
Card & Papercraft Tutorials
Please feel free to comment below, and ask away with any questions. You can also find me via the links below


Blog:

Online Store:

Stamping @ The Warren Craft Forum:

Email:
kim.tolton@googlemail.com

youTube


Pinterest:

Google +

Facebook:

Twitter:

Instagram:
@kim.tolton

LinkedIn:
Friday 29 July 2016

Lovely As A Tree is Better Together with a Work of Art & Stampin' Up! Products UK


Feel free to CASE any of my creative projects (Copy & Paste Everything)


PRODUCTS USED TODAY

STAMP SETS
LOVELY AS A TREE
WORK OF ART
BETTER TOGETHER

INK PADS
ARCHIVAL OR MEMENTO BLACK
CRUSHED CURRY
CAJUN CRAZE
ALWAYS ARTICHOKE
ISLAND INDIGO

CARDSTOCK
WHISPER WHITE
NIGHT OF NAVY

ACCESSORIES
REGALS ENAMEL SHAPES

TOOLS
STAMPIN TRIMMER
ACRYLIC BLOCK BUNDLE
PAPER PIERCING TOOL
BONE FOLDER

ADHESIVES
TOMBOW MULTI PURPOSE LIQUID GLUE


Watch the Video Below

Tutorial

  1. Trim a piece of Night of Navy Cardstock to 30 x 10.5 cms; score long side at 14.9 cms; fold & burnish
  2. trim two pieces of whisper white cardstock to 14 x 10.1 cms; Using Tombow Liquid Glue, stick one of these pieces of cardstock inside the card base (to write your greeting on)
  3. You are going to stamp onto the second piece of Whisper White Cardstock
  4. Pick the medium sizes faux watercolour stamp from WORK OF ART stamp set, and stamp once in an arc shape using the following ink pads - Crushed Curry, Cajun Craze, Always Artichoke; then swap the stamp for the large arc one, and over stamp the above using Island Indigo Ink Pad
  5. Using Black Ink, Stamp the Lovely As A Tree so it partially overlaps the images you have already stamped.
  6. Stamp the Greeting in the top left using Black Ink Pad
  7. E,mbellish with a few Regals Enamel Shapes
  8. Mat onto the card base using Tombow

How to Contact or Follow Me


Kim Tolton, Independent Stampin Up Demonstrator.
Card & Papercraft Tutorials
Please feel free to comment below, and ask away with any questions. You can also find me via the links below


Blog:

Online Store:

Stamping @ The Warren Craft Forum:

Email:
kim.tolton@googlemail.com

youTube


Pinterest:

Google +

Facebook:

Twitter:

Instagram:
@kim.tolton

LinkedIn:

Thursday 28 July 2016

Marker to Stamp Technique Butterfly Basics Friendship Card using Stampin' Up Products! UK


Tutorial is further down today's Blog Post

Butterfly Basics is a Super Stamp Set, whose popularity was such, that this wonderful stamp has rolled over from last years Stampin' Up! Catalogue. But I am on a mission to ensure people do not forget about the versatility of this Collage Stamp Set. So 
I have used a few techniques here. 

First is Random Stamping
This is simply what it says on the box ... it creates a randomness. Many card makers struggle with the need to create randomness. But 
Why is this necessary? Well, nature is random. We live in a world where people are obsessed by summitry, but in fact, our eye is attracted to the random. Begin with the Power of Three .... Virtually, split your card into thirds, and build your design around that.

Secondly, I have used Generation Stamping
This just means that you ink up your stamp and stamp onto the project four times, before re-inking your stamp .. The more intense the colour is, the more times you can stamp the cardstock before you need to re-ink.
This allows you to create gradients of the same colour using just one ink pad. 
Think Pain Chip Samples

Thirdly, I have used a Marker to Stamp Technique.
Traditionally, you would use a Marking Technique to stamp two or more colours in the same stamping.
By using Markers, you can ink up just the portions of the stamp you want to use.
It is fun and quick, but you do need to remember to clean your stamp after each stamping to avoid contaminating the markers.

Finally, I used a Stamping Off The Page Technique
This means you do not stamp the whole image onto the cardstock. and it works alongside Random Stamping  and Generation Stamping

Feel free to CASE any of my creative projects (Copy & Paste Everything)


Tutorial

  1. CARD BASE - Trim a Piece of Thicker White Cardstock to 12.5 x 25 cms; score the ;ong side at 12.5 cms; fold & Burnish
  2. Trim a piece of Whisper White Cardstock to 11.5 x 11.5 cms; stamp two diagonal stripes (one from Delightful Dijon & the other using Dapper Denim Ink Pads; next, stamp the honeycomb stamp to create the background,  using Mint Macaron Ink Pad, and fourth Generation Stamping (the amount of times you stamp the cardstock before re-inking the stamp)
  3. Now for the Marker to Stamp Technique. You will need the following Stampin Write Markers - Watermelon Wonder & Cucumber Crush. Use the green maker to ink up the leaf sections of the large flower, and the Watermelon Wonder to ink up the flower; Give a big 'huff' over the stamp, and then stamp onto the cardstock.; Randomly stamp some of the small flowers using second generation stamping.
  4. Onto a scrap of Whisper White Cardstock,, Stamp a couple of small butterflies using Sweet Sugarplum Ink Pad, using Second Generation Stamping
  5. Stamp the Caterpillar Greeting using Early Espresso Ink Pad.
  6. Mat the panel onto a piece of Watermelon Wonder Cardstock measuring 12 x 12 cms
  7. Stamp your Greeting from the Teeny Tiny Sentiments Stamp Set using Early Espresso Ink Pad onto the bottom right of the Card Base
  8. Apply Stampin Dimensionals onto the back of the Layered Panel and mount onto the card base
  9. Punch out the two small butterflies using the Bitty Butterfly Punch & mount onto the card front using Mini Glue Dots, then add a few basic rhinestones

How to Contact or Follow Me

Kim Tolton, Independent Stampin Up Demonstrator.
Card & Papercraft Tutorials
Please feel free to comment below, and ask away with any questions. You can also find me via the links below


Blog:

Online Store:

Stamping @ The Warren Craft Forum:

Email:
kim.tolton@googlemail.com

youTube


Pinterest:

Google +

Facebook:

Twitter:

Instagram:
@kim.tolton

LinkedIn:

Wednesday 27 July 2016

Layering Love Petal Burst Copper on Black Double Embossed Card Stampin' Up! UK

Today, you get two techniques for the price of one
Heat Embossing
Dry Embossing

I adore Bold Stamp Sets that have inspirational words, and I love the  new Copper Embossing Powder even more, so I decided to combine the two. Since this is essentially a One Layer Card, I also wanted to add some interest, So I decided to use The Petal Burst Textured Impressions Embossing Folder for the lower third of the card base, and added a scrap of that lush Affectionately Your's Designer Series Paper.
The card was embellished with a Punched Butterfly using the Foiled Paper from the same Designer Series Paper Pack (DSP) and a few Basic Pearls
Super Quick to make and if you changed the DSP for a more masculine one, this card would work well for a man too.


·        
Feel free to CASE any of my creative projects (Copy & Paste Everything)


PRODUCTS USED TODAY

STAMP SET
LAYERING LOVE

CARDSTOCK
BASIC BLACK

DESIGNER SERIES PAPER (DSP)
AFFECTIONATELY YOURS

INK PAD
VERSAMARK

EMBOSSING POWDER
COPPER

TEXTURED IMPRESSIONS EMBOSSING FOLDER
PETAL BURST

PUNCH
ELEGANT BUTTERFLY

TOOLS
STAMPIN TRIMMER
EMBOSSING BUDDY
HEAT TOOL
PAPER SNIPS
BONE FOLDER
BIG SHOT

ACCESORIES
BASIC PEARLS

ADHESIVES
TOMBOW

Tutorial

  1. Trim a piece of Basic Black Cardstock to 30 x 10.5 cms; score at 17.9 cms; fold & Burnish
  2. Dry Emboss the lower third of the card base by partially inserting the embossing folder & run through your Big Shot
  3. Wipe the top section of the card base with your Embossing Buddy (to remove Static) then stamp the sentiment using Versamark Ink, Dust with Copper Embossing Powder & Heat Set
  4. Add a 1cm x 10.5 cm strip of scrap Designer Series Paper just above the Dry Embossed section
  5. Punch out a butterfly using the Elegant Butterfly Punch, from Foiled Paper and attach to the card front
  6. finish with some Basic Pearls

How to Contact or Follow Me


Kim Tolton, Independent Stampin Up Demonstrator.
Card & Papercraft Tutorials
Please feel free to comment below, and ask away with any questions. You can also find me via the links below


Blog:

Online Store:

Stamping @ The Warren Craft Forum:

Email:
kim.tolton@googlemail.com

youTube


Pinterest:

Google +

Facebook:

Twitter:

Instagram:
@kim.tolton

LinkedIn: