google-site-verification: google70410e9e92d4fda2.html
Showing posts with label rubber stamping. Show all posts

Thursday, 1 September 2016

A Moroccan Timeless Love Floral Phases Anniversary Card for my Hubby using Stampin' Up! Products

Today is a super quick tutorial as it is my Wedding Anniversary
We have been together 23 years, Marries for 16 Years
He is my Soulmate and Best Friend

And so this is his card for this year.

I began by using using a sponge brayer to add some subtle colour to the background with Dapper Denim Ink, to tie in the two halves of the card.

I used a combination of the Floral Phrases Stamp Set  and the Timeless Love Stamp Set to get the sentiment I wanted on the card front.
I also stamped  a sentiment inside the card

The designer Series Paper is called Moroccan & is why I chose to use Gold Ribbon to tie the two halves of the card together, and finally, used lots of teeny Basic Pearls to get more texture into the Card.

Feel free to CASE any of my creative projects (Copy & Paste Everything)


PRODUCTS USED TODAY

STAMP SETS
Floral Phrases - 141767
Timeless Love - 139408

CARDSTOCK
A4 Thick Whisper White -  140490

DESIGNER SERIES PAPER
Moroccan - 141645

INK PADS
Memento Black - 132708
Dapper Denim - 141394

ACCESSORIES
Basic Pearls - 119247
1/7" Gold Ribbon - 134583

DIES 
Sunshine Wishes - 141489

ADHESIVES
Multi-purpose Liquid Glue - 110755

TOOLS
Big Shot - 143263
Magnetic Platform - 130658
Stampin Trimmer - 129722
Sponge Brayer - 141714
Paper Snips - 103579
Bone folder - 103200
Acrylic Blocks (for clear mount stamps)
C - 118486
E - 118484
H - 118490
I - 118488

Measurements:

  • Card-base, Thick Whisper White 30 x 10.5 cms; score long side at 14.9 cms; fold & Burnish
  • Designer Series Paper - Moroccan - 10.1 x 4 cms

How to Contact or Follow Me


Kim Tolton, Independent Stampin Up Demonstrator.
Card & Papercraft Tutorials
Please feel free to comment below, and ask away with any questions. You can also find me via the links below


Blog:

Online Store:

Stamping @ The Warren Craft Forum:

Email:
kim.tolton@googlemail.com

youTube


Pinterest:

Google +

Facebook:

Twitter:

Instagram:
@kim.tolton

LinkedIn:

Tuesday, 23 August 2016

In This World Masculine Birthday Card using Stampin' Up! Products

Oh Boy, Is it hot or what?
Well, us Brits are not acclimatised for the hotter weather normally found in most of Europe
On top of that we are doing a Summer Clean of the house and grounds! 
Thank goodness we only do this twice a year he he

Anyway, it has meant I haven't posted as frequently as usual .... my apologies for that, 
But to compensate, I do have a super vintage style card for you 
Using the super dooper

IN THIS WORLD
Stamp Set from Stampin' Up!

I made this card for my Father in Law's Birthday
They live in rural Eire (southern Ireland) and although they built a new bungalow on their family's property, they kept the original Cottage that was home to the very many children that were born there over the generations
It is full of character. My Father In Law uses half of that cottage as his workshop
And this stamp set, so reminded me of that old cottage, with it's Boreen & a castle in the field behind their home.

The Birthday Sentiment comes from the 

BUILD A BIRTHDAY
 Stamp Set (also from Stampin' Up!)

I used a colour combination of 
Mint Macaron; Tip Top Taupe & Very Vanilla. 
The card was embellished with some of the new lush Burlap Ribbon - I LOVE it! and I am sure it will be used a great deal over the festive season.

I am now including the product item numbers on the Product List below this photo, to make ordering even easier for you, and my website link is there too
I have also included the dimensions of the cardstock that I used.
Remember to follow my Pinterest Community Board (Stamping At The Warren) so I can invite you to join and start pinning your own Stampin' Up! Makes


Feel free to CASE any of my creative projects (Copy & Paste Everything)


  • Cardstock Dimensions: 
  • CARD BASE Mint Macaron - 30 x 10.5 cms; Score long side @ 14.9 cms; fold & Burnish
  • INSIDE INSERT: W - Very Vanilla 14.4 x 10.1 cms
  • Tip Top Taupe - 6 x 8 cms
  • Mat Layer 1 - Mint Macaron: 6.4 x 8.4 cms
  • Mat Layer 2: Tip Top Taupe 6.8 x 8.8
PRODUCTS USED:
Stamp Sets

In This World  142654
Build A Birthday 138646

Cardstock -
 
Mint Macaron, 138344
Tip Top Taupe; 138343
Very Vanilla 106550

Ink Pads

Tip Top Taupe  138325
Memento Black 132708

Accessories - 

Burlap Ribbon 141487

Tools - 

Stampin Trimmer; 129722
Paper Snips; 103579
Bone Folder;102300
 Acrylic Blocks 118491

Adhesives - 

Multipurpose Liquid Glue;110755
 Stampin Dimensionals104430


How to Contact or Follow Me


Kim Tolton, Independent Stampin Up Demonstrator.
Card & Papercraft Tutorials
Please feel free to comment below, and ask away with any questions. You can also find me via the links below
Blog:

Online Store:

Stamping @ The Warren Craft Forum:

Email:
kim.tolton@googlemail.com

youTube


Pinterest:

Google +

Facebook:

Twitter:

Instagram:
@kim.tolton

LinkedIn:

Thursday, 18 August 2016

Thoughtful Branches Bundle Handmade Die Cut & Stamped Autumnal Card using Stampin' Up! products

Firstly, my apologies for not posting a project yesterday. I woke with a really severe migraine that knocked me for six, and I just could not cope with the brightness of the computer screen.
Today is another day, and all is well

So I decided to share with you one of the projects I will be demonstrating in my next Stamp & Craft Class

It features the Thoughtful Branches Stamp Set, that I featured recently.
If you like what you see, you only have a few days left to purchase it before it is gone for good.

Today's card differs from the three cards from my last class, as these two cards are using both the the positive and negative die cuts from the co-ordinating Die Pack (you can get this offer as a 10% Bundle & Save via my online store)
The black background created a dramatic effect, and really makes the Die Cut Trees, stand out.

I also used the Thoughtful Banners with the Banner Duo Punch

Below, you will find a list of products listed below, along with the accompanying video tutorial

Enjoy


Feel free to CASE any of my creative projects (Copy & Paste Everything)


PRODUCTS USED TODAY

STAMP SET
Thoughtful Branches

FRAMELITS DIES/PUNCHES
Beautiful Branches Framelits Dies
Banner Duo Punch

INK PADS
Always Artichoke
Delightful Dijon
Cajun Craze
Tip Top Taupe
Black Memento

CARDSTOCK
Whisper White
Basic Black

ADHESIVES
Tombow Multi-Purpose Liquid Glue
Stampin Dimensionals

TOOLS
Big Shot Die Cutting machine
Magnetic Platform
Stampin Trimmer
Acrylic Blocks
Paper Snips
Bone Folder

Watch the Video Below

Tutorial

CARDBASE -  Basic Black 30 x 10.5 cms; score long side at 14.9 cms; fold & burnish

PANEL FOR THE INSIDE OF THE CARD BASE- Whisper White Panel - 14.4 X 10.1 CMS

PANEL ONE - Basic Black Cardstock measuring 14.4 x 10.1 cms
PANEL TWO - Whisper White measuring 14 x 9.7 cms


How to Contact or Follow Me


Kim Tolton, Independent Stampin Up Demonstrator.
Card & Papercraft Tutorials
Please feel free to comment below, and ask away with any questions. You can also find me via the links below


Blog:

Online Store:

Stamping @ The Warren Craft Forum:

Email:
kim.tolton@googlemail.com

youTube


Pinterest:

Google +

Facebook:

Twitter:

Instagram:
@kim.tolton

LinkedIn:

Tuesday, 16 August 2016

A Festive Jar of Love Dry Embossed Handmade Card Using Stampin' Up! Products UK

Today's Card came about as I have begun thinking about the handmade gifts I am making for friends and family this year. Preserving is a bog love for me , and since we had an over abundance of gooseberries this year, I have already made a bumper batch of Gooseberry Jam Most of our gooseberry bushes are the Blush variety, and that is how this card came about. 
Rich Razzelberry, is about the same colour as my Jam. So I used the Rich Razzelberry Cardstock and dry embossed it with the Festive Textured Impressions Embossing Folder (TIEF)
Since I usually use Burlap or fabric to cover the lid of my jars, I replicated that fot the smallest of 

Everyday Jars Die Cut.

To give the Christmas Feel, I added a strip of that lush and very festive Gold Foiled  Affectionately Yours Designer Series Paper. Finally I added a few Gold Enamel Shapes (hearts) and stamped the sentiment from the Jar of Love stamp set and added banner ends before adding it as a tag for the jar.

You may also like to know, that there is a BUNDLE & SAVE 10% saving when you purchase the Stamp set and co-ordinating Framelits Dies Bundle

As always, there is a list of products below


Feel free to CASE any of my creative projects (Copy & Paste Everything)


STAMP SET
Jar of Love

CARDSTOCK
Ruch Razzelberry
Whisper White

INK PADS
Rich Razzelberry
Archival Gray
Archival Black
Soft Suede

DESIGNER SERIES PAPER
Affectionately Yours

FRAMELITS DIES
Every Day Jars

EMBOSSING FOLDER
Festive

ACCESSORIES
Metalic Enamel Dots

ADHESIVES
Stampin Dimensionals
Tombow

TOOLS
Stampin Trimmer
Magnetic Platform
Big Shot
Paper Snips
Bone Folder
Paper Piercing Tool


How to Contact or Follow Me


Kim Tolton, Independent Stampin Up Demonstrator.
Card & Papercraft Tutorials
Please feel free to comment below, and ask away with any questions. You can also find me via the links below


Blog:

Online Store:

Stamping @ The Warren Craft Forum:

Email:
kim.tolton@googlemail.com

youTube


Pinterest:

Google +

Facebook:

Twitter:

Instagram:
@kim.tolton

LinkedIn:

Saturday, 13 August 2016

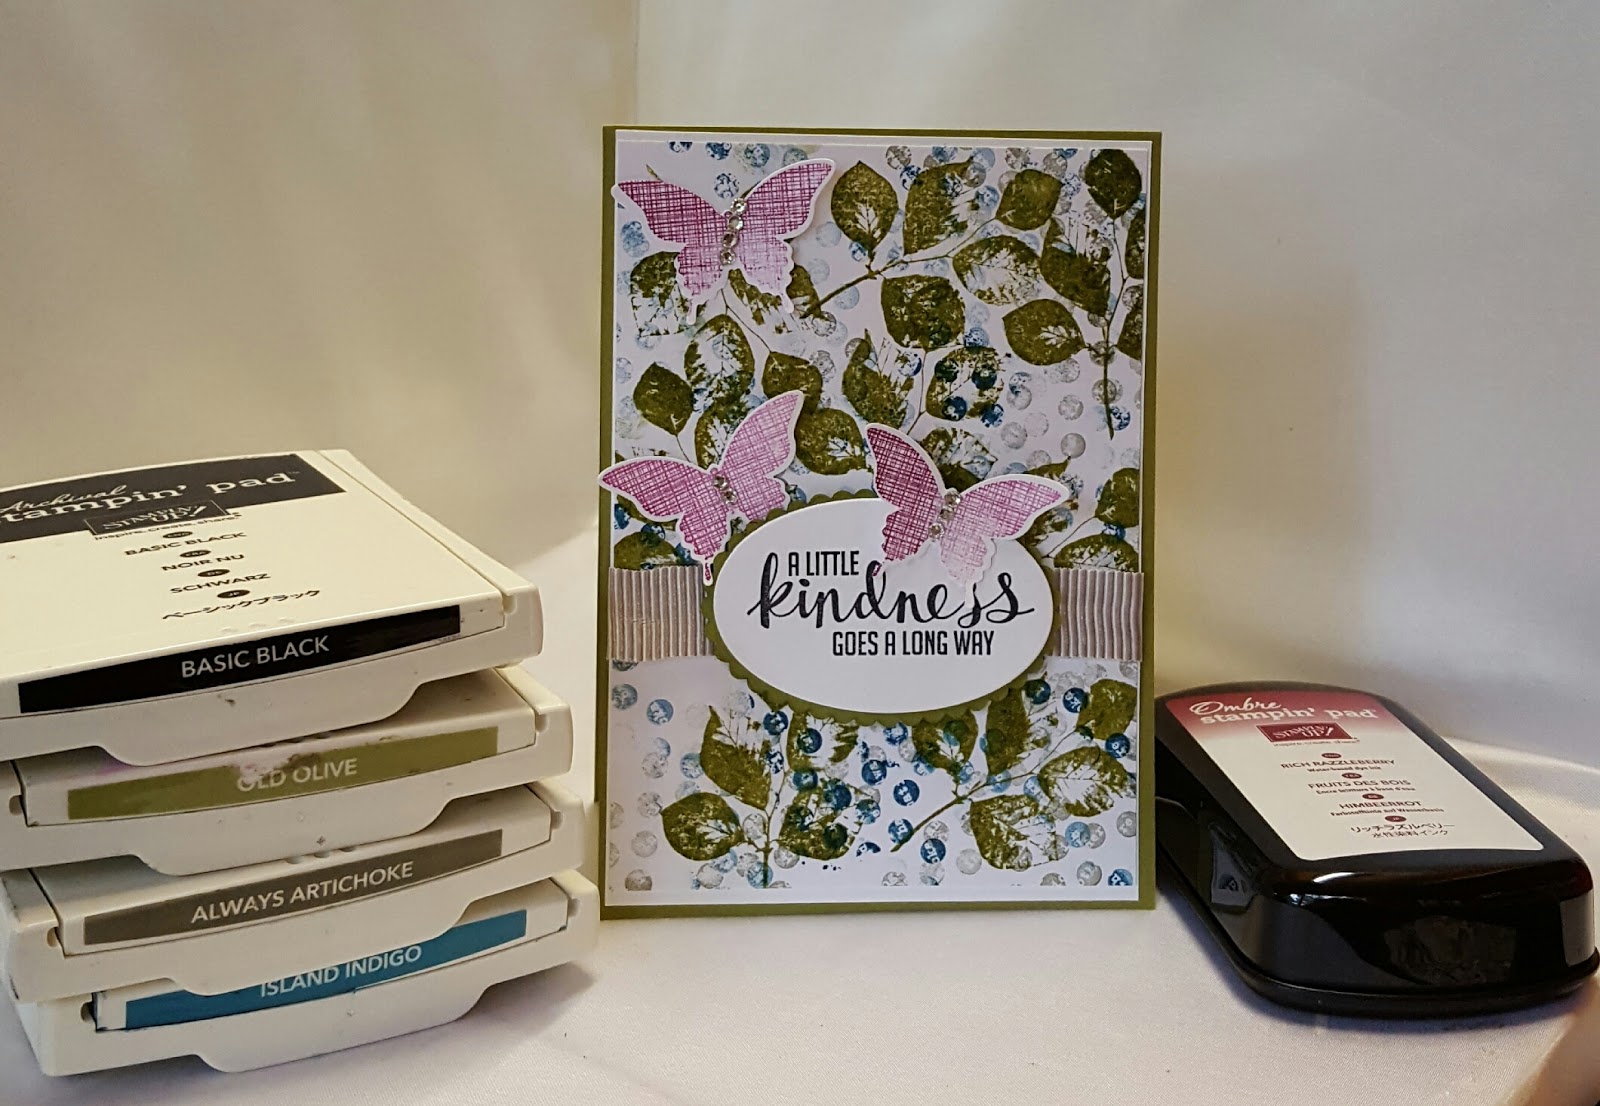
Collage Background for Handmade Cards Using Kinda Eclectic Stamp Set from Stampin' Up! UK

I hope you have a great weekend planned, and that the weather is as lovely as it is here in Essex UK?
We have our grandchildren staying with us, and will be taking them and our dogs to the Park for some fun time together

Before we go. I wanted to share with you the third of three cards with you featuring the

KINDA ECLECTIC
STAMP SET
 from Stampin' Up!

Kinda Eclectic is a Versatile Collage Stamp Set that is perfect for creating your own Designer Series Papers.
Despite using the same stamp set and ink pads for all three cards, each card has a unique look, just by altering the design template, dies and accessories

In this sample, the Island Indigo (blue) is much more prominent in this card.
The Rich Razzelberry Ombre Ink Pad, has again been used for the butterflies, and by using a different area of the ombre ink pad, you get different shades of colour for the butterflies.
I have kept the accessories simple with some Tip Top Taupe Mini Stripped Ribbon and Basic Rhinestones.

You can find a list of all the products used to create today's card listed below, and a link to my online store


Feel free to CASE any of my creative projects (Copy & Paste Everything)


PRODUCTS USED TODAY

STAMP SET
Kinda Eclectic

CARDSTOCK
Whisper White
Old Olive

INK PADS
island indigo
old olive
always artichoke
memento or archival black
Rich Razzelberry Ombre Ink Pad


DIES/PUNCHES
Elegant Butterfly Punch
Layering Ovals Framelits Dies

ACCESSORIES
Tip Top Taupe Mini Stripped Ribbon
Basic Rhinestones

TOOLS
Stampin Trimmer
Acrylic Blocks
Big Shot Die Cutting Machine
Magnetic Platform
bone folder
paper snips
paper piercing tool

ADHESIVES
mini glue dots
stampin dimensionals
tombow mutipurpose liquid glue
tear & tape adhesive


How to Contact or Follow Me

Kim Tolton, Independent Stampin Up Demonstrator.
Card & Papercraft Tutorials
Please feel free to comment below, and ask away with any questions. You can also find me via the links below


Blog:

Online Store:

Stamping @ The Warren Craft Forum:

Email:
kim.tolton@googlemail.com

youTube


Pinterest:

Google +

Facebook:

Twitter:

Instagram:
@kim.tolton

LinkedIn: