google-site-verification: google70410e9e92d4fda2.html
Showing posts with label cards. Show all posts

Tuesday, 27 September 2016

Better Together With Blooms & Bliss One Sheet Wonder Handmade Cards using Stampin' Up! Products UK

This is a follow on of my last blog post. I have used the same products, but changing the emphasis of the colourscheme to Mint Macaron, Dapper Denim & Tip Top Taupe, and you end up with a completely different look to the cards. I hope you like then 


Feel free to CASE any of my creative projects (Copy & Paste Everything)


Click HERE to view/order any of the products used Today


How to Contact or Follow Me


Kim Tolton, Independent Stampin Up Demonstrator.
Card & Papercraft Tutorials
Please feel free to comment below, and ask away with any questions. You can also find me via the links below


Instagram:
@kim.tolton


Saturday, 13 August 2016

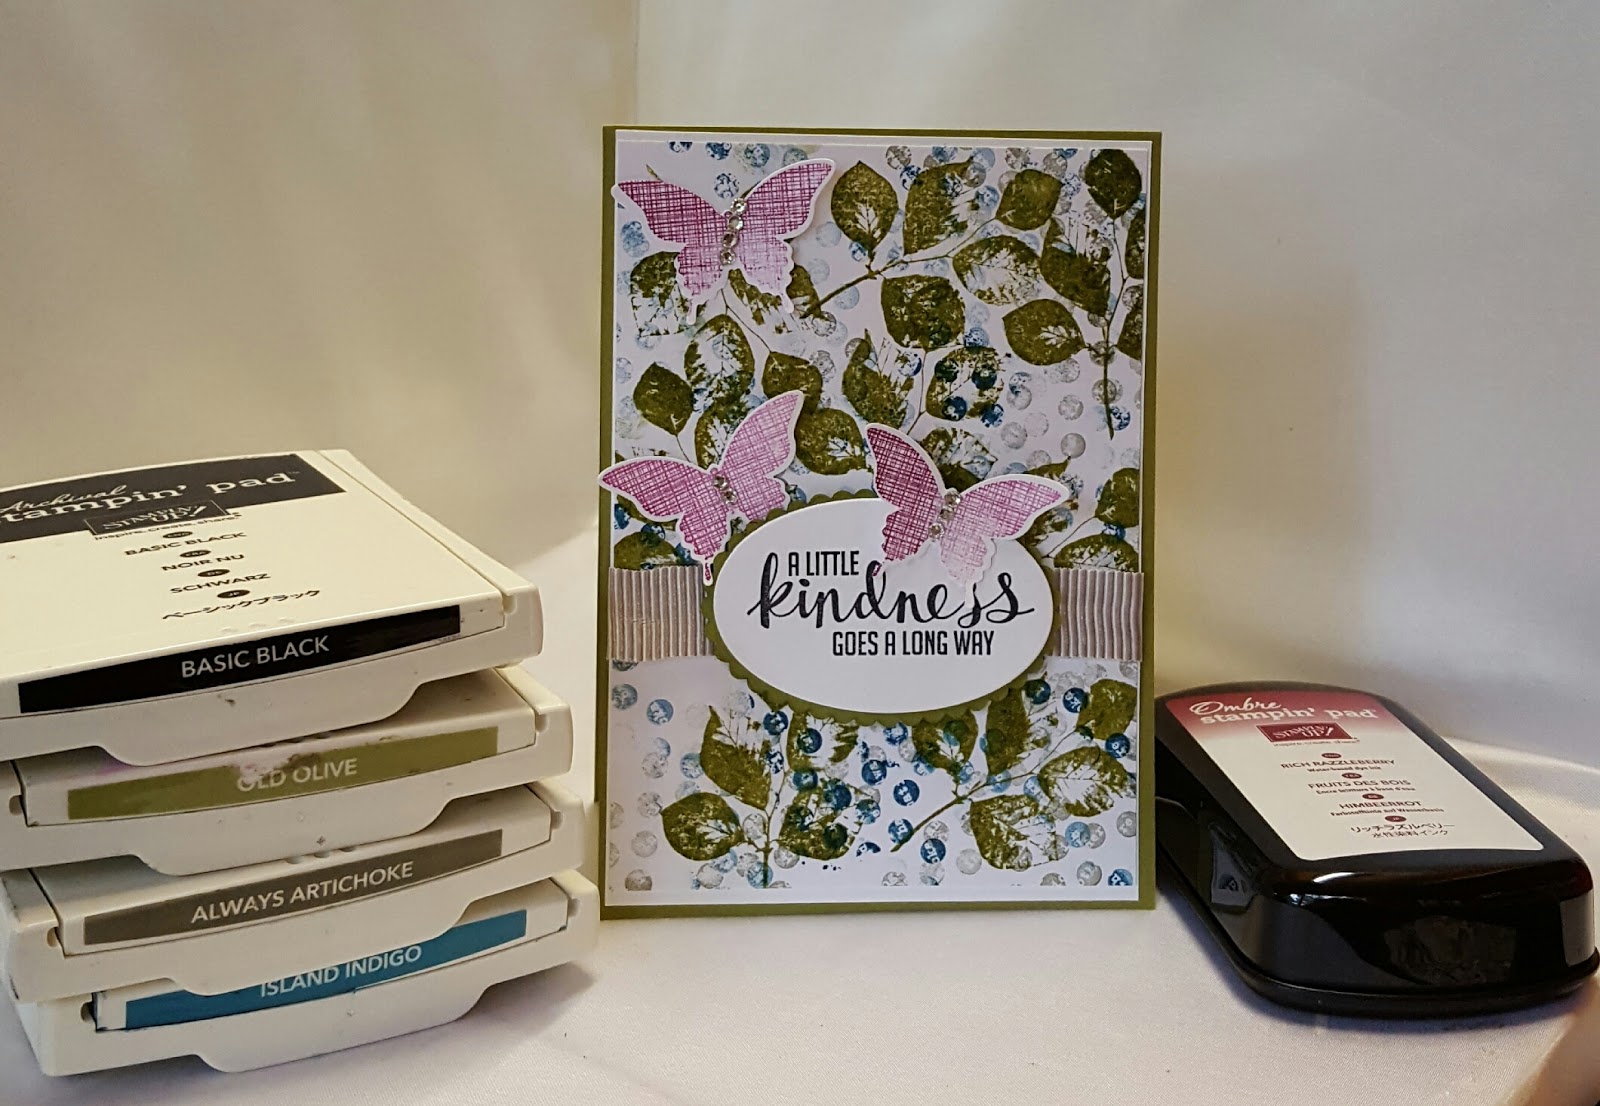
Collage Background for Handmade Cards Using Kinda Eclectic Stamp Set from Stampin' Up! UK

I hope you have a great weekend planned, and that the weather is as lovely as it is here in Essex UK?
We have our grandchildren staying with us, and will be taking them and our dogs to the Park for some fun time together

Before we go. I wanted to share with you the third of three cards with you featuring the

KINDA ECLECTIC
STAMP SET
 from Stampin' Up!

Kinda Eclectic is a Versatile Collage Stamp Set that is perfect for creating your own Designer Series Papers.
Despite using the same stamp set and ink pads for all three cards, each card has a unique look, just by altering the design template, dies and accessories

In this sample, the Island Indigo (blue) is much more prominent in this card.
The Rich Razzelberry Ombre Ink Pad, has again been used for the butterflies, and by using a different area of the ombre ink pad, you get different shades of colour for the butterflies.
I have kept the accessories simple with some Tip Top Taupe Mini Stripped Ribbon and Basic Rhinestones.

You can find a list of all the products used to create today's card listed below, and a link to my online store


Feel free to CASE any of my creative projects (Copy & Paste Everything)


PRODUCTS USED TODAY

STAMP SET
Kinda Eclectic

CARDSTOCK
Whisper White
Old Olive

INK PADS
island indigo
old olive
always artichoke
memento or archival black
Rich Razzelberry Ombre Ink Pad


DIES/PUNCHES
Elegant Butterfly Punch
Layering Ovals Framelits Dies

ACCESSORIES
Tip Top Taupe Mini Stripped Ribbon
Basic Rhinestones

TOOLS
Stampin Trimmer
Acrylic Blocks
Big Shot Die Cutting Machine
Magnetic Platform
bone folder
paper snips
paper piercing tool

ADHESIVES
mini glue dots
stampin dimensionals
tombow mutipurpose liquid glue
tear & tape adhesive


How to Contact or Follow Me

Kim Tolton, Independent Stampin Up Demonstrator.
Card & Papercraft Tutorials
Please feel free to comment below, and ask away with any questions. You can also find me via the links below


Blog:

Online Store:

Stamping @ The Warren Craft Forum:

Email:
kim.tolton@googlemail.com

youTube


Pinterest:

Google +

Facebook:

Twitter:

Instagram:
@kim.tolton

LinkedIn:

Friday, 5 August 2016

Brushstrokes Flourishing phrases & Embellished Ornaments Handmade Christmas Card Stampin' Up! UK


Can you believe it is Saturday again? The weeks are flying past, and I am starting to think on the designs I will be using for this years Christmas Cards ... I Know, I can hear you groaning from here.
And for this card, I need feedback from you, my faithful followers please?

 The two cards in the photo, differ, and I want to know if you prefer the design with the leaves? or the one without the leaves?

For this design, I wanted to keep it clean, crisp, and simple 

The colour-scheme was kept equally simple, using ink pads from the Brights Colour Collection

Daffodil Delight
Old Olive
& Real Red
With Cherry Cobbler for the Card base 

It does mean I have used three stamp sets, but for me it is worth it
The background uses the Brushstrokes Stamp Set
The Flower & leaves are from the Flourishing Phrases Stamp Set
& the festive sentiment is from the Delicate Ornaments Stamp Set
Embellishment was kept equally simple with Basic Rhinestones for that Festive Twinkle.


Feel free to CASE any of my creative projects (Copy & Paste Everything)


PRODUCTS USED TODAY

STAMP SETS
BRUSHSTROKES
DELICATE ORNAMENTS
FLOURISHING PHRASES

CARDSTOCK
CHERRY COBBLER
WHISPER WHITE

INK PADS
ARCHIVAL OR MEMENTO BLACK
DAFFODIL DELIGHT
OLD OLIVE
REAL RED

ACCESSORIES
BASIC RHINESTONES

TOOLS
ACRYLIC BLOCK BUNDLE
STAMPIN TRIMMER
BONE FOLDER

ADHESIVES
TOMBOW MULTI-PURPOSE LIQUID GLUE


Tutorial

  1. CARD BASE - Trim a piece of Cherry Cobbler Cardstock to 30 x 10.5 cms; score long side at 14.9 cms; fold & Burnish
  2. Trim two pieces of Whisper White Cardstock to 14.4 x 10.1 cms; adhere one piece inside the card base for writing/stamping your greeting, I used Tombow Liquid Glue
  3. The other Whisper White Panel, begin by using the Brushstrokes Stamp Set with Daffodil Delight and stamp so the lines are horizontal to the cardstock
  4. Over stamp this with the Large flower stamp from the Flourishing Phrases Stamp Set; Stamp one using Old Olive Ink Pad, and another using the Real Red Ink Pad.
  5.  If you prefer the design with the leaves, add these in now
  6. Stamp the Sentiment from the Delicate Ornaments Stamp Set, using Archival or Memento Black
  7. Mat (layer) onto your card base and embellish with  some small Basic Rhinestones.

How to Contact or Follow Me

Kim Tolton, Independent Stampin Up Demonstrator.
Card & Papercraft Tutorials
Please feel free to comment below, and ask away with any questions. You can also find me via the links below


Blog:

Online Store:

Stamping @ The Warren Craft Forum:

Email:
kim.tolton@googlemail.com

youTube


Pinterest:

Google +

Facebook:

Twitter:

Instagram:
@kim.tolton

LinkedIn:

Thursday, 14 July 2016

Wherever You Go Masculine Card Stampin' Up! UK

I hope your day is as bright & Sunny as it is here in Essex. Yesterdays Thunderstorm is long gone, thank Goodness , as our Puppy doesn't much care for them!

And so today's card reflects the weather, using the 


WHEREVER YOU GO Stamp Set 
from Stampin' Up!

For another Masculine Card

The Sky Background was created using one of Stampin Up!s new Single Use Sponge Brayers with the Soft Sky Ink pad
The Sunburst  is stamped in  Daffodil Delight Ink, the Birds in Archival Grey, and the Bridge & Sentiment are stamped in Archival Black ink.

After Stamping the Sentiment, I die cut it using the Layering Oval Framelits & run through my Big Shot using the Magnetic Platform. The sentiment was then trimmed to give a straight base, and popped up using Stampin Dimensionals.

Supplies List  can be found below


·        Feel free to CASE any of my creative projects (Copy & Paste Everything)


PRODUCTS LIST

STAMP SET
WHEREVER YOU GO

CARDSTOCK
WHISPER WHITE
BASIC BLACK

INK PADS
ARCHIVAL BLACK
ARCHIVAL GRAY
DAFFODIL DELIGHT

FRAMELITS DIES
LAYERING OVALS

TOOLS
BIG SHOT DIE CUTTING MACHINE
STAMPIN TRIMMER
STAMPIN SPONGE
SPONGE BRAYER
PAPER SNIPS
BONE FOLDER

ADHESIVES
TOMBOW MULTIPURPOSE LIQUID GLUE
STAMPIN DIMENSIONALS


How to Contact or Follow Me


Kim Tolton, Independent Stampin Up Demonstrator.
Card & Papercraft Tutorials
Please feel free to comment below, and ask away with any questions. You can also find me via the links below


Blog:

Online Store:

Stamping @ The Warren Craft Forum:

Email:
kim.tolton@googlemail.com

youTube


Pinterest:

Google +

Facebook:

Twitter:

Instagram:
@kim.tolton

LinkedIn:

Wednesday, 13 July 2016

Wetlands Meets A Work f Art Unisex Birthday Card Stampin' Up! UK

It was My Dad's 76th Birthday at the weekend, and as he only recently had a card for Fathers Day, that was very grungy, I decided to go with something very different. with this lighter & Brighter Card that could be used for a Man or Woman. 
The anchor stamp & Grass Stamp helps to tie the card's unisex possibilities.
I went with the Subtles Collection for the background, using a combination of Pool Party, Soft Sky & Pear Pizzaz. Ink Pads, and Soft Suede for that wonderful warm brown.
The whole card was tided together by using some Linen Threat and some Subtles Enamel Shapes.


I used three stamp sets to create this card and two die cuts

STAMP SETS
WETLANDS
FROM LAND TO SEA
WORK OF ART

FRAMELITS DIES
LOTS OF LABELS
LAYERING SQUARES


Kim Tolton, Independent Stampin Up Demonstrator.
Card & Papercraft Tutorials
Please feel free to comment below, and ask away with any questions. You can also find me via the links below


Blog:

Online Store:

Stamping @ The Warren Craft Forum:

Email:
kim.tolton@googlemail.com

youTube


Pinterest:

Google +

Facebook:

Twitter:

Instagram:
@kim.tolton

LinkedIn:

Thursday, 7 July 2016

Sweet & Sassy Pop of Paradise Quick Cards using Stampin' Up! Products UK

Today, I am sharing with you a selection of cards that I have made using the Pop of Paradise Stamp Set from Stampin' Up!
These cards are super easy and super fast to make, and the Black and Melon Mambo Contrast with the White, is just so dramatic. I used less than 1/2 sheet, from 3 different papers in the Pop of Pink DSP Pack. So they are cost effective to make too.
I used a selection of Nesting Dies, containing either Ovals, Hearts or Circles. You could use Circle punches if you have them
Scroll down for the tutorial


Feel free to CASE any of my creative projects (Copy & Paste Everything)


STAMP SET
POP OF PARADISE

CARDSTOCK/IK PADS
BASIC BLACK
WHISPER WHITE
MELON MAMBO

DIES
SWEET & SASSY
lAYERING OVALS
LAYERING CIRCLES

DESIGNER SERIES PAPER (DSP)
POP OF PINK

ACCESORIES
STITCHED SATIN RIBBON

TOOLS
BIG SHOT
MAGNETIC PLATFORM
STAMPIN TRIMMER
PAPER SNIPS
BONE FOLDER
ACRYLIC BLOCKS

ADHESIVES
TOMBOW LIQUID GLUE
STAMPIN DIMENSIONALS
MINI GLUE DOTS
Watch the Video Below


Tutorial

  1. trim a piece of Basic Black Cardstock to 30 x 10.5 cms (A6 CARD BASE)' score at 14.9 cms; fold & burnish
  2. Trim a piece of Pop of Pink Designer Series Paper to 14.4 x 10.1 cms & adhere to the card base.Trim a piece of contrasting DSP to 2 x 14.4 cns (just use the reverse side of the paper you have mounted onto the card base), and adhere the strip down one side of the card front
  3. Stamp the sentiment of your choice using Archival Black Ink Pad, and select either the Sweet & Sassy,Layering Circles or Layering Ovals Framelits Mount onto your card front, and that is the asic card made. Now go have some fun and make a selection of cards yourself.

How to Contact or Follow Me


Kim Tolton, Independent Stampin Up Demonstrator.
Card & Papercraft Tutorials
Please feel free to comment below, and ask away with any questions. You can also find me via the links below


Blog:

Online Store:

Stamping @ The Warren Craft Forum:

Email:
kim.tolton@googlemail.com

youTube


Pinterest:

Google +

Facebook:

Twitter:

Instagram:
@kim.tolton

LinkedIn: