google-site-verification: google70410e9e92d4fda2.html
Showing posts with label Dies. Show all posts

Monday, 10 October 2016

Detailed floral Thinlits Dies with a Sponged & Copper Embossed Handmade Gate Fold Card Using Stampin' Up! Products UK

Well do I have a super Handmade  Card for you  today
I made a version of this card for for a field of mine as our Wedding Acceptance
I made a matching tag, that I put out acceptance on.


I used a combination of Crushed Curry, Rose Red & Peekaboo Peach Ink Pads for the sponging onto Thick Whisper White Cardstock, and was then Heat Embossed using Copper Embossing Powder (so on trend this year).
After the heat embossing, I then die cut the front panels of the card base using the Detailed Floral Thinlits Dies, and ran that through my Big Shot using the Precision Plate.

Watch the video below for full instrctions

Feel free to CASE any of my creative projects (Copy & Paste Everything)


How to Contact or Follow Me


Kim Tolton, Independent Stampin Up Demonstrator.
Card & Papercraft Tutorials
Please feel free to comment below, and ask away with any questions. You can also find me via the links below

ORDER NEW STAMPIN' UP! PRODUCTS ONLINE


PURCHASE RETIRED STAMP SETS ETC


Instagram:
@kim.tolton


Thursday, 18 August 2016

Thoughtful Branches Bundle Handmade Die Cut & Stamped Autumnal Card using Stampin' Up! products

Firstly, my apologies for not posting a project yesterday. I woke with a really severe migraine that knocked me for six, and I just could not cope with the brightness of the computer screen.
Today is another day, and all is well

So I decided to share with you one of the projects I will be demonstrating in my next Stamp & Craft Class

It features the Thoughtful Branches Stamp Set, that I featured recently.
If you like what you see, you only have a few days left to purchase it before it is gone for good.

Today's card differs from the three cards from my last class, as these two cards are using both the the positive and negative die cuts from the co-ordinating Die Pack (you can get this offer as a 10% Bundle & Save via my online store)
The black background created a dramatic effect, and really makes the Die Cut Trees, stand out.

I also used the Thoughtful Banners with the Banner Duo Punch

Below, you will find a list of products listed below, along with the accompanying video tutorial

Enjoy


Feel free to CASE any of my creative projects (Copy & Paste Everything)


PRODUCTS USED TODAY

STAMP SET
Thoughtful Branches

FRAMELITS DIES/PUNCHES
Beautiful Branches Framelits Dies
Banner Duo Punch

INK PADS
Always Artichoke
Delightful Dijon
Cajun Craze
Tip Top Taupe
Black Memento

CARDSTOCK
Whisper White
Basic Black

ADHESIVES
Tombow Multi-Purpose Liquid Glue
Stampin Dimensionals

TOOLS
Big Shot Die Cutting machine
Magnetic Platform
Stampin Trimmer
Acrylic Blocks
Paper Snips
Bone Folder

Watch the Video Below

Tutorial

CARDBASE -  Basic Black 30 x 10.5 cms; score long side at 14.9 cms; fold & burnish

PANEL FOR THE INSIDE OF THE CARD BASE- Whisper White Panel - 14.4 X 10.1 CMS

PANEL ONE - Basic Black Cardstock measuring 14.4 x 10.1 cms
PANEL TWO - Whisper White measuring 14 x 9.7 cms


How to Contact or Follow Me


Kim Tolton, Independent Stampin Up Demonstrator.
Card & Papercraft Tutorials
Please feel free to comment below, and ask away with any questions. You can also find me via the links below


Blog:

Online Store:

Stamping @ The Warren Craft Forum:

Email:
kim.tolton@googlemail.com

youTube


Pinterest:

Google +

Facebook:

Twitter:

Instagram:
@kim.tolton

LinkedIn:

Saturday, 13 August 2016

Detailed Floral Thinlits Dies Screen Fold Luminary Handmade Card using Stampin' Up! products UK

Today I have a super Card for you to make
The easiest way is to watch the video below, but I have also given you a list of all the products used to create the card, plus the dimensions & scoring details

I had been scratching my head, trying to find an alternate way of using the Detailed Floral Thinlits Dies from Stampin; Up! and had a moment of inspiration as I was falling asleep the other evening.
I had a Screen Fold Card on my list of projects to do, and I thought it would be great to have a go, and these photo's are my results

I would love to see your version of this card, as I can see these being a fab Christmas Decoration with the LED tealights behind the screen.


Feel free to CASE any of my creative projects (Copy & Paste Everything)


Tutorial

Stamp Set
Birthday Blooms

Cardstock,
 Cherry Cobbler
Night of Navy
White Velum

Ink Pad
Memento Black

Accessories
Cherry Cobbler Tassel (tin of tags)
Cherry Cobbler Duo Bakers Twine
LED Tea Light

Punches/Dies
Sweetheart Punch
Decorative Label Punch
Detailed Floral Thinlits  Dies
Hand Held Stapler

Tools
Big Shot Die Cutting Machine
Scoring Tool & Metric Plate
Precision Plate
Stampin Trimmer
Paper Piercing Tool
Bone Folder
Acrylic Blocks

Adhesives
Stampin Dimensionals
Fast Fuse
Mini Glue Dots


Di mentions:

Cardstock 30 x 14.8 cms
Score Short Side at 10.5 
Score  short side at 10.5 cms
Score Long Side at 10 & 20 20cms

White Vellum three of 11.5 x 9.6 cms


Watch the Video Below 


How to Contact or Follow Me


Kim Tolton, Independent Stampin Up Demonstrator.
Card & Papercraft Tutorials
Please feel free to comment below, and ask away with any questions. You can also find me via the links below


Blog:

Online Store:

Stamping @ The Warren Craft Forum:

Email:


kim.tolton@googlemail.com

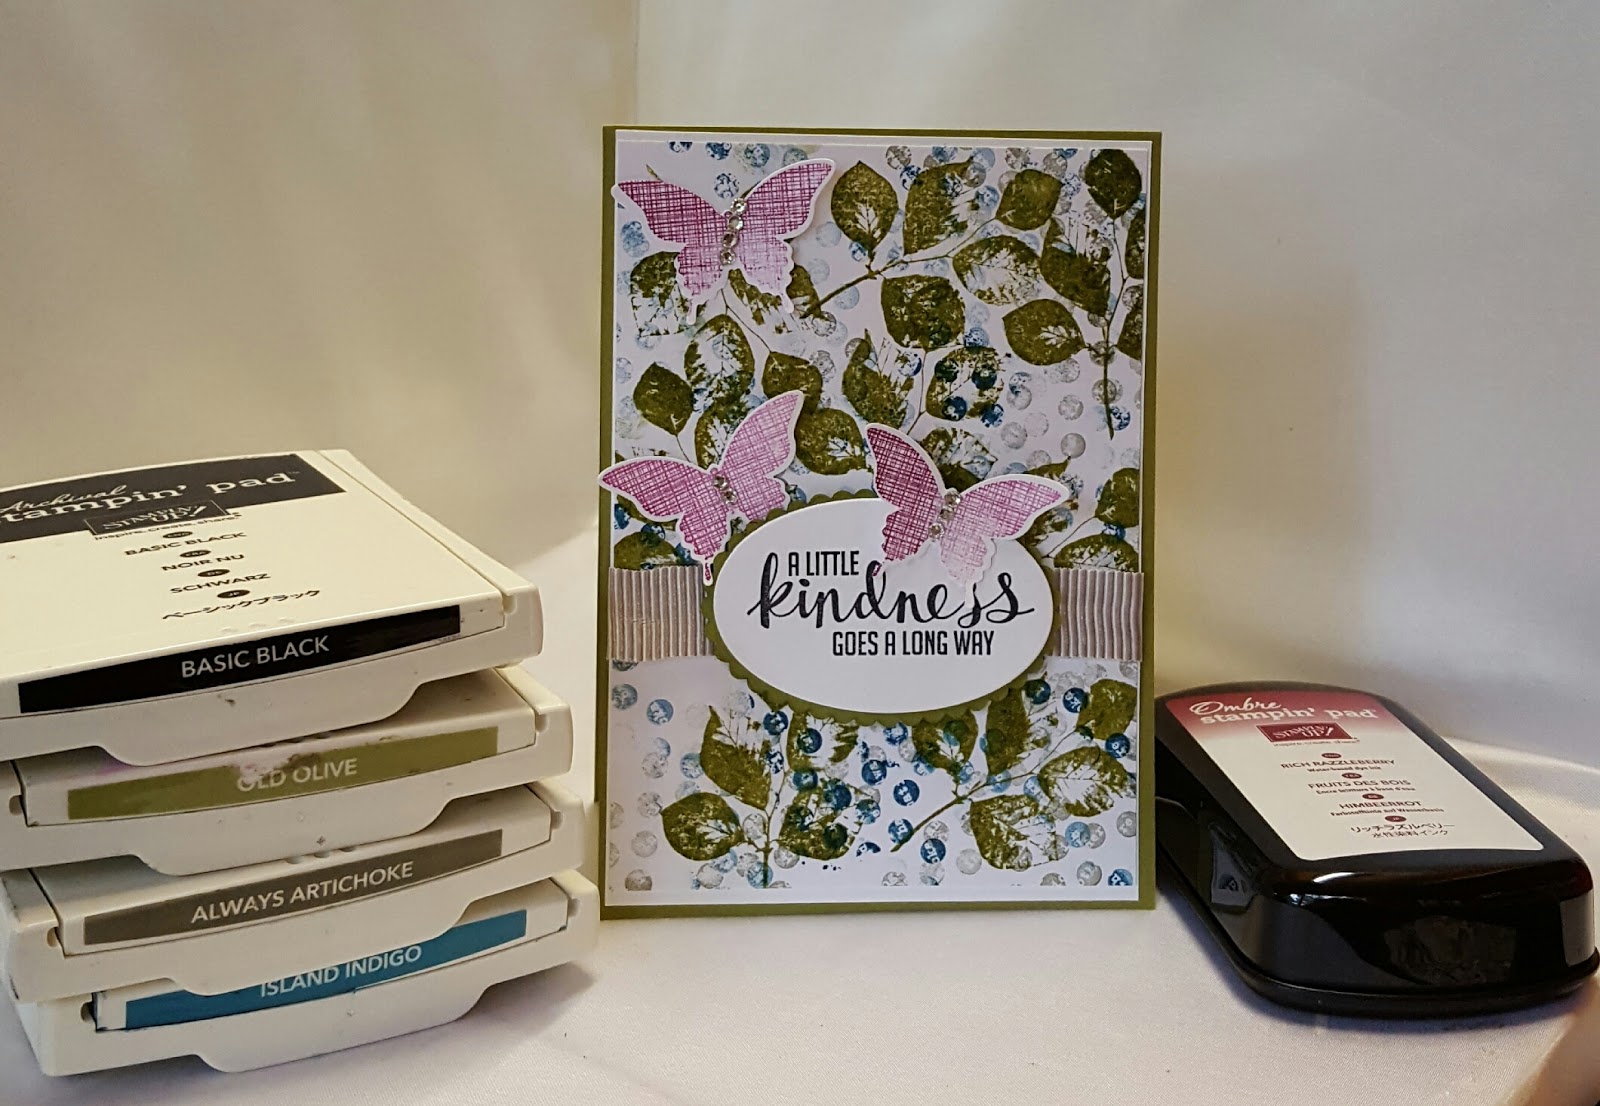
Collage Background for Handmade Cards Using Kinda Eclectic Stamp Set from Stampin' Up! UK

I hope you have a great weekend planned, and that the weather is as lovely as it is here in Essex UK?
We have our grandchildren staying with us, and will be taking them and our dogs to the Park for some fun time together

Before we go. I wanted to share with you the third of three cards with you featuring the

KINDA ECLECTIC
STAMP SET
 from Stampin' Up!

Kinda Eclectic is a Versatile Collage Stamp Set that is perfect for creating your own Designer Series Papers.
Despite using the same stamp set and ink pads for all three cards, each card has a unique look, just by altering the design template, dies and accessories

In this sample, the Island Indigo (blue) is much more prominent in this card.
The Rich Razzelberry Ombre Ink Pad, has again been used for the butterflies, and by using a different area of the ombre ink pad, you get different shades of colour for the butterflies.
I have kept the accessories simple with some Tip Top Taupe Mini Stripped Ribbon and Basic Rhinestones.

You can find a list of all the products used to create today's card listed below, and a link to my online store


Feel free to CASE any of my creative projects (Copy & Paste Everything)


PRODUCTS USED TODAY

STAMP SET
Kinda Eclectic

CARDSTOCK
Whisper White
Old Olive

INK PADS
island indigo
old olive
always artichoke
memento or archival black
Rich Razzelberry Ombre Ink Pad


DIES/PUNCHES
Elegant Butterfly Punch
Layering Ovals Framelits Dies

ACCESSORIES
Tip Top Taupe Mini Stripped Ribbon
Basic Rhinestones

TOOLS
Stampin Trimmer
Acrylic Blocks
Big Shot Die Cutting Machine
Magnetic Platform
bone folder
paper snips
paper piercing tool

ADHESIVES
mini glue dots
stampin dimensionals
tombow mutipurpose liquid glue
tear & tape adhesive


How to Contact or Follow Me

Kim Tolton, Independent Stampin Up Demonstrator.
Card & Papercraft Tutorials
Please feel free to comment below, and ask away with any questions. You can also find me via the links below


Blog:

Online Store:

Stamping @ The Warren Craft Forum:

Email:
kim.tolton@googlemail.com

youTube


Pinterest:

Google +

Facebook:

Twitter:

Instagram:
@kim.tolton

LinkedIn:

Wednesday, 10 August 2016

Flowering Phrases Handmade Cards using Stampin'Up! Products UK

Welcome Back to Stamping At The Warren
Today I am sharing with you a very quick and simple One Layer Card, made using the 

FLOWERING PHRASES.STAMP SET
From Stampin Up!

I love having a variety of One Layer Cards,stashed away in a drawer, ready for those unexpected moments, when you need a card in a flask. Generally, I do not put the sentiment onto the card, until  Iam going to post or hand t the card to someone. That way, I can quickly add an appropriate Sentiment for the occasion.

Since this card has been created using one of the Bundles in Stampin' Up Catalogue, it is perfect for the complete novice, as well as seasoned crafters who just find themselves short of time.
The list of products is short too, making this a cost effective way of easing yourself into (or back into) Card Making.

Below you will find a list of the products I used for today's project, as well as a typed tutorial and Video Tutorial.

If you would like to place an order, but are uncertain about what you need, just drop me a line for a chat and assistance starting yourself with a starter kit.

Feel free to CASE any of my creative projects (Copy & Paste Everything)


PRODUCTS USED TODAY

STAMP SET
Flowering Phrases

THINLITS DIES
Flourish

INK PADS
2016 - 2018 In Colour  Ink Pads
2016 - 2018 In Colour Classic Ink Pads

CARDSTOCK
2016 - 2018 In Colour Cardstock Assorment
Whisper White

ACCESSORIES
2016 - 2016 In Colour Enamel Shapes

TOOLS
Big Shot
Magnetic or Multipurpose Platform
Stampin Trimmer
Acrylic Blocks (if you do not have wood mounted stamps)
Bone Folder
Paper Snips

ADHESIVES
Tombow Multi-Purpose Liquid Glue
Fine Tip Glue Pen

Watch the Video Below

Tutorial

  1. CARDBASE - Trim a piece of Peekaboo Peach A4 Cardstock to 30 x 10.5 cms; score long side at 14.9 cms; gold & Burnish
  2. Trim a piece of Whisper White Cardstock to 14.4 x 10.1 cms & adhere inside the card base for you to write or stamp your greeting
  3. Using the Flirty Flamingo Ink Pad, randomly stamp the card front with the large flower stamp from the Flowering Phrases Stamp Set
  4. Stamp your sentiment onto the cardfront, again using Flirty Flamingo Card-stock
  5. die cut the mosaic border die from a 2 x 14.4 cms strip of Flirty Flamingo Cardstock; adhere to the card front on the diagonal. Snip off any excess cardstock using paper snips
  6. Finish with some In Colour Enamel Shapes

How to Contact or Follow Me


Kim Tolton, Independent Stampin Up Demonstrator.
Card & Papercraft Tutorials
Please feel free to comment below, and ask away with any questions. You can also find me via the links below


Blog:

Online Store:

Stamping @ The Warren Craft Forum:

Email:
kim.tolton@googlemail.com

youTube


Pinterest:

Google +

Facebook:

Twitter:

Instagram:
@kim.tolton

LinkedIn:

Monday, 8 August 2016

Fun at the Fair Goldfish with a Jar of Love is Affectionately Yours Using Stampin' Up! Products UK


We have our Grandchildren staying with us during the Summer Holidays, and last week they went to the Circus, that also had a Fun Fair
That got me to thinking about the design of today's card. It just reminds me of my own childhood, when the funfair, playing Hoopla for Goldfish in a Jar.

I have used the

 Jar of Love & Co-coordinating Every Day Jars Framelits Dies.

You can purchase these items individually, or you can opt for the Bundle & Save option, giving you a 10% discount on the purchase price.
The stamp set offers so endless possibilities, and each stamp has a co-ordinating Die

I went with an orange, Gray & White Colour-scheme, and a Mint Macaron Paper from the
Affectionately Yours Designer Series Paper Pack (which includes two glorious foiled papers)

I added co-ordinating Enamel Dots and Gold Thread to complete the card, 

Below is the Tutorial, and list of products used to create today's card


Feel free to CASE any of my creative projects (Copy & Paste Everything)


PRODUCTS USED TODAY

STAMP SET
Jar of Love

FRAMELITS DIES
Everyday Jars

INK PADS
Basic Gray
Memento Black
Pumpkin Pie
Soft Sky
watermelon wonder

CARDSTOCK
Pumpkin Pie
Whisper White

DESIGNER SERIES PAPER (DSP)
Affectionately Yours

ACCESSORIES
Brights Collection  Enamel Shapes
Gold Thread

TOOLS
Big Shot
Magnetic Platform
Stampin Trimmer
Paper Piercing Tool
Bone Folder
Paper Snips
Acrylic Blocks

ADHESIVES
Tombow Multipurpose Liquid Glue
Stampin Dimensionals
Fine Tip Glue Pen

Tutorial

  1. CARD BASE - Trim a piece of Pumpkin Pie Cardstock to 30 x 10.5 cms; Score long side at 14.9 cms; fold & burnish
  2. Trim a piece of Mint Macaron Affectionately Yours DSP to 14.4 x 10.1 cms; mat onto the card base
  3. Onto Scraps of White cardstock, stamp the large jar & Handel using Basic Grey Ink Pad, and Die cut using the co-ordinating Die
  4. Stamp the Water stamp using Soft Sky ink pad, and stamp three times so the jar appears full of water; over stamp this with two goldfish; Stamp another Goldfish in watermelon Wonder ink pad, and die cut. Add to the jar; Wrap some Gold Thread around 2 fingers several times, and partially adhere to the back of the Jr and mount;using a cut down piece of Stampin Dimensionals; Mount the Jar onto the card base using Stampin Dimensionals
  5. Finish with some co-ordinating Enamel Shapes

How to Contact or Follow Me


Kim Tolton, Independent Stampin Up Demonstrator.
Card & Papercraft Tutorials
Please feel free to comment below, and ask away with any questions. You can also find me via the links below


Blog:

Online Store:

Stamping @ The Warren Craft Forum:

Email:
kim.tolton@googlemail.com

youTube


Pinterest:

Google +

Facebook:

Twitter:

Instagram:
@kim.tolton

LinkedIn: