google-site-verification: google70410e9e92d4fda2.html
Showing posts with label downloads. Show all posts

Tuesday, 29 September 2015

Jolly Christmas


Here is the tutorial

  1. begin by creating your card base, by trimming a piece of Thicker A4 Whisper White Cardstock to 15 cms (6") x 30 cms (12")
  2. Trim a piece of Soft Suede Cardstock to 12.8 cms x 12.8 cms
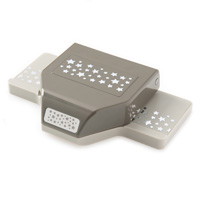
  3. Punch along the top of the Soft Suede Cardstock using Confetti Stars Border Punch
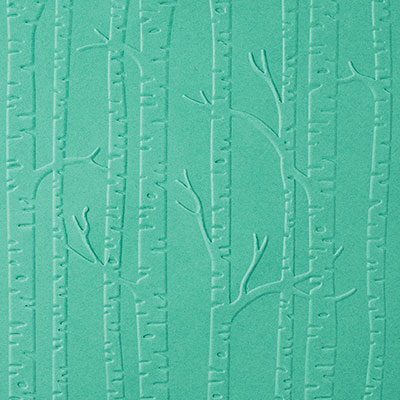
  4. Dry Emboss the Soft Suede Panel using the Woodland Textured Impressions Embossing Folder (TIEF) and run it through your bog shot Die Cutting Machine (using the multi-purpose platform)
  5. Ink up a sponge dauber with White Craft Ink, and sponge ALL the embossed (raised impressions) areas of the panel with White Craft Ink, re-inking the sponge dauber as required. Don't press too hard or you will flatten those lived embossed trees  
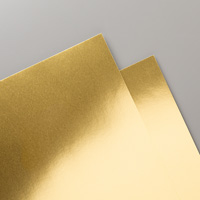
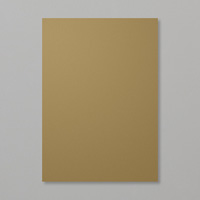
  6. Mat (layer) this panel onto a piece of Gold Foiled Cardstock measuring 13.2 cms x 13.2 cms, using Fast Fuse Adhesive.
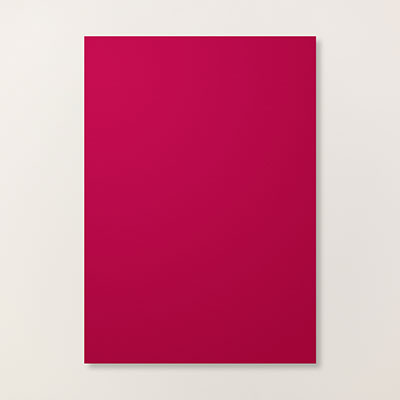
  7. Then mat this onto a piece of Cherry Cobbler Cardstock measuring 13.6 cms x 13.6 cms
  8. Now, you need to die cut the NOEL sentiment using the Christmas Greetings Dies & Cherry Cobbler Cardstock. For the best result, use the new Precision Plate in conjunction with your Big Shot, as this is an intricate die. Alternatively, you can use your Magnetic Platform and place a piece of Wax Paper )just the stuff for wrapping sarnies) between the cardstock and the die. This will help in removing the die.
  9. Next, you have a little Heat Embossing using the Jolly Christmas Stamp Set,; ink up the Deer Stamp with Versamark and stamp onto a scrap of Whisper White Cardstock. Dust with Gold Embossing Powder and Heat Set using your Heat Tool Cut the image out using your Paper Snips. Remember to rotate the cardstock, and not your scissors for best results, and leave a narrow border of the white cardstock so the image stands out once mounted,
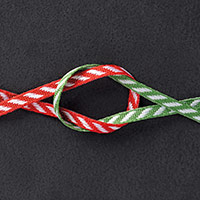
  10. You are now on the home straight. All that is left to do, is Dress your card and mount it onto the card base. Begin by wrapping around a piece of Real Red Stripped Ribbon, and tying a bow.Next add the Celebrate and wooden element and the embossed Deer using Stampin Dimensionals, and then add the NOEL to the top section of the card front using the new Fine Tip Glue Pen. Apply a couple of strips of Fast Fuse Adhesive to the back of the Cherry Cobbler panel and mount this onto your card base. Job Done .... easier than you thought ... I hope?

And below you will see the product icons, click on them to order via my online store 24/7
Table built using Product Table Builder by The Crafty Owl - Independent Stampin' Up! Demonstrator.


Join my Pinterest community board,
where you can share your own Stampin Up Creations?
Follow the Pinterest Board on the left hand side bar and I will send you an invitation to follow the Stampin Up! At The Warren Community Pinterest Board

If you have any questions on techniques or products, or Joining my Team/discussing the business opportunities Stampin Up! Can offer
Contact Me

Or telephone/text 07759587004

Happy Stamping
Kim xxx         

Order your Craft Supplies on line 24/7

http://www.stampinup.net/esuite/home/stampinupatthewarren/

Friday, 24 April 2015

Faux Mock Flock & Apothecary Acents Dies

Welcome to Fun Friday

Why is it Fun Friday? I hear you all ask.... 
well the reason is because you are going to have SO much FUN using this Mock Flock Technique
It is really simple to do, and gives a fab effect.

Pattern you can see on the flowers was created by stamping the HANDCARVED Background Stamp over your trimmed Whisper White Cardstock using White Craft Ink.
 (and yes, it is on the retiring list!) 
You then need to be really patient and wait for the craft ink to dry (it takes time) I did try using a heat tool to speed up the process but the cardstock warped.
Once dry, you then need a solid stamp - such as the one in the Petal Potpourri Stamp Set 
(Petal Potpourri also comes as a bundle with the co-ordinating punch at a 15% cost saving)

I went with the dramatic colour scheme, using Mossy Meadow, Hello Honey, and Lost Lagoon from the 2014 - 2016 In Colour Collection.

You won't see the pattination until the ink dries, but I really love it, and I really did have fun making it. I have a few more using the same technique to show you over the next couple of days,

You will probably notice the sentiment has been stamped onto that divine label from Apothecary Accents Dies. I feel sooo sad that this Die pack is retiring as it is my most favourite Stampin Up! Die, but I am sure there will be something amazing taking it's place.

To View or Order items from the Retiring List, simply click on the RETIRING banner below


Trim your Whisper White Cardstock to size allowing for matting (layering) it into a slightly larger piece of Whisper White Cardstock, and then onto a White Card Blank

Stamp your patterned background stamp all over the smallest layer of Whisper White cardstock using White Craft Ink.
Put it to one side whilst you wait for the ink to dry (craft ink does take longer than normal ink)

Once dry, stamp a solid stamp using no more than 3 colours over the cardstock and wait for the transformation. You will need to clean your stamp between re-inking with your coloured inks as a little White Ink is transferred to the stamp.


Next, stamp your sentiment onto a piece of Whisper White Cardstock using Black Stazon Ink
Die cut a the sentiment label using this beautiful Apothecary Accents Die,
Attach a small piece of a Tea Lace Doily to the back of the Label. and apply Stampin Dimensionals to the reverse and mount onto your card front.
Finish with a bow using White Jute Ribbon


By the time I had finished this posting the Handcarved Stamp Set has already SOLD OUT! So on the products images below, I have substituted the background stamp with POSITIVELY CHEVRON
Simply Click on the icons below and it will take you straight to the item in my online store
Table built using Product Table Builder by The Crafty Owl - Independent Stampin' Up! Demonstrator.

.
If you would like to become a member of my Pinterest Community Board where you will be able to post your own Stampin Up! Makes please email me via
If you have any questions on techniques, orders, products etc, please ask away by adding comments below, or you  contact me via:-


Thursday, 23 April 2015

2015 Stampin Up! Catalogue Countdown - Blooming with Kindness

I have a feeling that today may just be a Windy Wednesday!

Not good for our Honey Bees as they hate foraging when it is windy & we need them to be active to pollinate all our fruit trees and Berry Canes
We had no Quince fruits last year because there was a heavy frost, right when the fruit should have set, so we really want some Quince this year ... help us by crossing your fingers and toes that our bees get the job done in time  he he

Anyway .... Today I am showcasing another Stamp Set that is on Stampin Up!s retiring list.
But please remember, stocks are only available until supplies are depleted, so please do not risk ordering your stamp set too far in the future or you may just lose out on bagging yourself some real bargains.

If you want to have a look at the products in the retiring list promotion, or to place your order online, just click the RETIRING BANNER below and it will take you straight to my store


You are probably wondering why I have been wittering along about my fruit trees & bushes getting pollinated? Well it is today's stamp set that put the thought in my mind

Blooming With Kindness

This stamp set comes not only with this beautiful stamp, but several stylish sentiment stamps too


This stamp set looks fab whether it is in a very quick and  simple card like this, or a more complex one.


I trimmed my Whisper White Cardstock to size, allowing for it to be mat (layered) onto Whisper White, and then onto a White A6 Card Blank (card base)

Stamp the flower using Lost Lagoon Classic Ink Pad using First, Second & Third Generation stamping technique. (this just means you stamp the image 3 times before re-inking the stamp)

BUT WAIT

Before stamping your Third flower, use a sponge dauber to add the tiniest amount of Blackberry Bliss ink to a couple of areas on the stamp. This will allow a little blending of the two colours giving a subtle two tone look to the stamp.

Please do practice this technique on your Grid Paper or Scrap Paper before stamping onto your card front.

I then used the residual ink on this stamp, to stamp the top left hand corner of the card front. It should leave just a whisper of colour that is barely visible, and then stamp your chosen sentiment over this area using Blackberry Bliss Classic Ink Pad (now you will understand why I added some subtle colour to that third flower).

Layer up using Stampin Dimensionals and attach to your A6 White Card Blank.

All that is left, is for you to think of someone who would love to receive this card  from you?

As always, feel free to CASE away

Happy Stamping

Kim xxx


If you would like to become a member of my Pinterest Community Board where you will be able to post your own Stampin Up! Makes please email me via
If you have any questions on techniques, orders, products etc, please ask away by adding comments below, or you  contact me via:-
Table built using Product Table Builder by The Crafty Owl - Independent Stampin' Up! Demonstrator.