I am really excited about the card I am sharing with you today!
I had great fun playing with the Heart & Hme Thin
When I was designing the layout of this card, I wanted to re-create find memories from childhood. For a time, we lived on a farm, and that winter was magical .... very cold, but magical.
Me and my brothers lay on the rustic wooden floor, peering through the gaps between the floorboards, to try and see what our parents were wrapping up, and whether the parcel was intended for one of us!
On the frosty mornings, there would be icicles on the inside of the windows, and my goodness, did it snow! and snow, and snow!
The inglenook fireplace would have a roaring fire to warm us in the evenings, before early to bed with our hot water bottles to keep warm through the night.
No such thing as central heating in rural Paglesham!!
I also remember horseriding in the snow, and spending the days at the local livery stables, taking flasks of steaming soup with as we worked our way around skipping out all the horses .... the best days of my teenage years!
I like to think today's card is a good representation of those wonderful childhood memories.
Christmas for me, is one of reminiscence, family and thanks for what we have, whilst keeping safe the family traditions around christmas time.

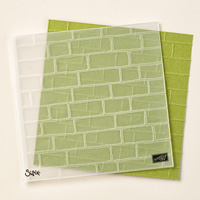
I began by dry embossing a panel of Crumb Cake Cardstock with the Brick Wall Textured Impressions Embossing Folder (TIEF). This was sponged with Crumb Cake Classic Ink Pad, to create a more natural brick effect.
Next, I die cut the window frame using the Hearth & Home Thinlits Dies, using a scrap of cardstock that was previously stamped with the Hardwood Stamp Set.
Before attaching the Window Frame onto the Brick Wall panel. I stamped the conifer stamp from Winter Wishes Stamp Set, using mossy Meadow Classic Ink Pad, around the frame area. and a little on the lower window seal too. Whilst you have the Winter Wishes Stamp Set out, stamp the Warm Wishes stamp onto a scrap of Whisper White Cardstock using Early Espresso Classic Ink Pad. And then stamp 5 of the pine cones using Early Espresso Classic Ink Pad onto Crumb Cake cardstock, and cut out using paper snips, Sponge the edges of the pine cones with a little Early Espresso Ink. & put to one side along with your sentiment.
Mat (layer) this panel onto a piece of Marina Mist Cardstock.

Next, you are going to create that snow scene through the window.
Stamp the Happy Scenes conifers a couple of times onto a piece of Whisper White Cardstock, slightly larger than the window frame, using Versamark Ink Pad.
Dust with White Embossing Powder and heat set with your Heat Tool.
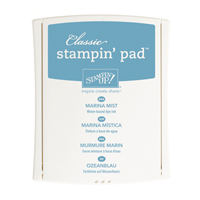
Ink up a sponge Dauber with Marina Mist ink (using the ink pad), and sponge off any excess ink onto some scrap paper. Sponge over and around the heat embossed images, building the colour in layers slowly.
Die cut out the images using the Window Frame Thinlit again (take your time to select the most aesthetic view before committing to die cut).
All that is left for you to do, is to dress your window with the pine cones, sentiment, and some Linen Thread, using a combination of Glue Dots and and Stampin Dimensionals to adhere these elements to the card front.
Adhere the card front onto a 6" Square Whisper White Card Base.
and below are the products used to create today's card.
Click on the product icons to view them in more detail, or to place an order in my online store.
 |  |  |  |  |
 |  |  |  |  |
 |  |  |  |  |
 |  |  |  |  |
 | 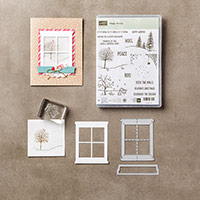 | 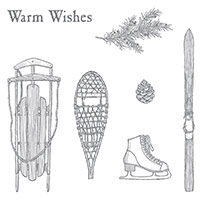 |  |
Table built using Product Table Builder by The Crafty Owl - Independent Stampin' Up! Demonstrator.

Join my Pinterest community board,
Where you can share your own Stampin Up Creations?
Follow the Pinterest Board on the left hand side
bar and I will send you an invitation to follow the Stampin Up! At The Warren
Community Pinterest Board
If you have any
questions on techniques or products, or Joining my Team/discussing the business
opportunities Stampin Up! Can offer
Contact Me
Or telephone/text
07759587004
Happy Stamping
Kim
xxx
Order your Craft
Supplies on line 24/7
http://www.stampinup.net/esuite/home/stampinupatthewarren/