google-site-verification: google70410e9e92d4fda2.html
Showing posts with label This and That. Show all posts

Wednesday, 2 December 2015

Stampin Up! Oh What Fun we're Home for Christmas

Today I have another quick and simple card for you to make for your nearest and dearest this Christmas.
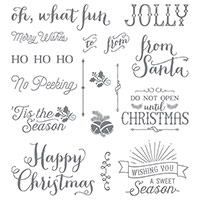
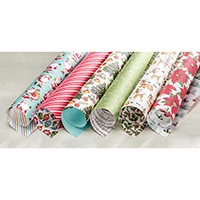
Today's card features Stampin Up!s Home for Christmas Designer Series Papers and the Oh What Fun Stamp Set, with a little bling in the form of some Dazzling Diamonds Banners that are tucked behind the 'Wishing You A Sweet Season' Sentiment label
Even a complete novice could make this card in less than 10 minutes, as it is mostly about trimming pieces of card and decorative paper.

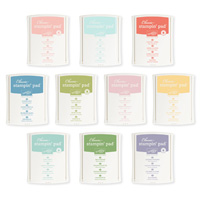
 Below you will find the icons for the products used to create today's card
Click on the icons to view them or order them via my Demonstrator Website
Table built using Product Table Builder by The Crafty Owl - Independent Stampin' Up! Demonstrator.

Watch the Video Below

Make your Card Base by trimming a piece of Thicker Whisper White Cardstock to 21 cms x 14.8 cms; score the long side at 10 cms; fold and burnish
  1. Trim a piece of diagonally striped Home For Christmas Designer Series Papers measuring 14 cms x 6 cms. Adhere to the card front using Fast Fuse Adhesive
  2. Trim a piece of the snowy village paper from the Home For Christmas DSP Pack measuring ; adhere across the centre of the card front using Fast Fuse
  3. Stamp your sentiment onto a scrap of Very Vanilla Cardstock and the Mossy Meadow Classic Ink Pad and the Oh What Fun Stamp Set
  4. Punch out the sentiment using the 2" Circle Punch
  5. Using the Banner Punch, punch out three banners using Dazzling Diamonds Glimmer Paper
  6. add some Tape & Tear adhesive to the back of the circle and adhere the banners to them
  7. Mount the sentiment label onto the cardfront using Stampin Dimensionals

Kim Tolton, Independent Stampin Up Demonstrator.
Card & Papercraft Tutorials
Please feel free to comment below, and ask away with any questions. You can also find me via the links below
Blog:

Online Store:

Stamping @ The Warren Craft Forum:

Email:

Pinterest:

Google +

Facebook:

Twittert:

Instagram:
 @kim.tolton

 LinkedIn:

Sunday, 3 May 2015

This & That Retirement Jounral Card

I know, I know, I missed doing a blog post yesterday! It doesn't happen often, but I promise I have a very good reason .... well reasons.

The first 'thing' is that my husband keeps putting up blocks to stop me working, telling me it is under the doctors orders, and that I am doing things I maybe shouldn't. So he gets a stern scowl each time he finds a reason to extract me from my workroom, 

Yesterday was ... we need to update an print off another batch of our Rabbit & Guinea Pig (cavy) Information sheets.
hrumph!! and rather unstimulating.

Then as I snuck in the workshop in the evening, Steve came in and said," I've just got take out, you need to come indoors ... Oh & I have purchased a new DVD thought we could watch it this-evening." hmmm

So I watched the video ... it was OK, but my mind was on a rush order I had to get done today.
One of my ex-colleages contacted me to let me know one of the Porters was retiring , and would I make the card. I explained I would love to, but larger than an A5 size card doesn't always stand up to the job and suggested they go with a retirement journal where staff could write their 'so longs' or anecdotal stories, along with some photo's. She loved the idea.

It just so happened that I have a few This & That Journals stored away for just such occasions.
So today I have been masculinising the journal, adding stamped elements, quirky stickers, pockets, note card and envelopes using the co-ordinating Epic Day Designer Series Papers, Sticker Packs and Washi Tape.
The main sentiment comes from the Adventure Awaits Stamp Set  and the smaller sentiments are from Crazy About Stamp Set & ends punched using the banner punch Y the larger sentiment was die cut using the Deco Label Framelits on top of a banner tag.
The background for the sentiment was the World Map background stamp
The colour scheme through the  journal and the front cover is Wild Wasabi, Sahara Sand and, Early Espresso and Soft Suede.


The more feminine pages in the journal were given a more masculine make over using the Epic Day DSP. As were the front and back covers. The front cover was embellished with a wood button, Subtles Cando Dots and Linen Thread


Click on the banner below to view the Retiring List


And the good news, is that many of the items I have used today are on the retiring list!
Simply click on the product icons below to view them in my online store
But, as I may have mentioned once or twice, once retiring products are gone, they are gone, never to return.

Table built using Product Table Builder by The Crafty Owl - Independent Stampin' Up! Demonstrator.


If you would like to join my Pinterest community board where you will be able to post your own Stampin Up creations. Simply email me and I will add you to the board

If you would like to ask any questions on techniques or products, or anything else related to my blog posts, please feel free to ask away
Happy Stamping
Kim xxx

Contact me to order:
Telephone/Txt: 07759587004


Tuesday, 31 March 2015

Sale A Bration 2015 Week 12 Day 7 Cheers To Love

Bokeh Technique

I have seen the Bokeh Technique popping up all over the internet, and although my hubby is big with his photography and has used this technique in that medium, but it never occurred to me to give it a co with my card making.

So here it is ... and I LOVED playing with the Circles Mask from Stampin up! with White Craft Ink and  sponge dauber.


Begin by sponging your background onto a 10 cms x 14.3 cms piece of Whisper White cardstock.
I used a Stampin Sponge and each of the Subtles  Collection Classic ink pads to create your multi-coloured background.
Then use a little Washi Tape to hold the piece of cardstock down, and also tape down the circles Mask. 
Ink up the sponge dauber with White Craft Ink and work it into the circles. Keep moving the mask after giving the ink a chance to dry, overlapping the circles you have already formed to create a multi-tonal background.
Trim a piece of White Vellum to 14.3 cms x 10 cms and adhere the Vellum to the card front using Glue Dots
Use the Banners Framelits to make one large and one small banner from Marina Mist and Blushing Bridge cardstock respectively.
Dry emboss the large banner with the Happy Hearts Textured Impressions Embossing Folder.
Attach the banners as shown above.
Cut a Tea Lace Doily in half and overlap it at the top of the card front and stick in place.


Finally Stamp the BRIDE stamp onto a piece of Whisper White cardstock using Black Stazon ink and adhere in place using a little Tombow Multi-Purpose Glue.
Attach the card front to an A6 White Card Blank,
Time for you htp have some fun ... go CASE away!


If you would like to join my Pinterest community board where you will be able to post your own Stampin Up creations. Simply email me and I will add you to the board

If you would like to ask any questions on techniques or products, or anything else related to my blog posts, please feel free to ask away
Happy Stamping
Kim xxx

Contact me to order:
Telephone/Txt: 07759587004
Email: kim@stampinupatthewarren.com

Or Order Online 24/7
                                                                                               
Or Click on the image of the products used below and it will take you straight to my online store
Table built using Product Table Builder by The Crafty Owl - Independent Stampin' Up! Demonstrator.