google-site-verification: google70410e9e92d4fda2.html

Saturday, 2 August 2014

Stamp Set Showcase Week 4 (1)

Good Morning Ladies and Gentlemen at the start of a new week, and that means a new Stamp Set Showcase and this week it will be

WETLANDS

This is a real favourite of mine. And yes, I have said that about many stamp sets I own, but it isn't my fault that Stampin Up makes such delectable stamps! I spent the day today sorting out all the retired stamp sets from those on my shelves, and put the retired ones  on a shelving unit I use just for retired or seasonal products. I was horrified to see so many go, but in a way, felt very virtuous being able to get all my current stamp sets (including sentiment stamps) all onto just one of my Dressers. I still use all my stamp sets for the handmade cards and gift boxes for clients and my own purposes, but it makes it easier to have all current stamp sets in one area of the workshop,


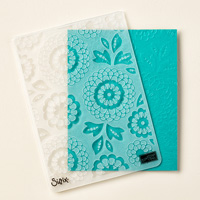
Anyway, i digress somewhat!. Today's project is using one of Stampin up's new products, the Kraft Grid Journals that great Hostess gifts, or a little gift for any of your friends and family. If you want t o make this for a chap, just omit the doilym and stamp additional stamps to make the background.


And here are the instructions on how to make this little lovely.
Begin by Stamping the small Gull images over the front cover of the Grid journal using Lost Lagoon ink.
Next your need to stock a doily to the front of the Jounal. I found Tombow Multipurpose Glue to be the best product to use.


Now stamp the Goose image on a piece of Whisper White Cardstock. Partially overstamp this with the Grass image, stamping in Mossy Meadow ink. If you have a new juicy ink pad, you will need to ink off the stamp onto some scrap paper so the colour is less intense.
Die cut this image using the Circles Die Collection . Then die cut the size up using Lost Lagoon cardstock. Apply Stampin Dimensionals to the back of both. Mount the stamped circle on top of the List Lagoon circle of cardstock..

Now get a scrap of Typeset DSP and overstamp using the Lost Lagoon ink with the sentiment of your choice from the Wetlands stamp set. Die cut this using the smallest label in the Project Life Cards & Labels Die. Then make banner tails at the end of one piece.Adhere this label to the lower left section of the doily, after inking the edges of the label in Lost Lagoon ink.


Feed a piece of Venetian Crochet Trim between the layers of the mounted circke. Tie a knot/bow. Take some Linen Thread and wind it around 2 of your fingers seven or eight times  and tie a knot. select 3 blue buttons and add some linen thread to the buttons. Tie knots to each and trim the tails,
use glue dots to stick down the buttons and linen threat hand tied bow.

How easy was that then? 


Contact us for further information on our Handmade Greetings Cards, Wedding Stationary and Gift Packaging Service

Telephone: 08432896848
Text@ 07759587004

Or Shop Online for all your papercraft supplies  24/7
Happy Stamping
Kim xxx
Table built using Product Table Builder by The Crafty Owl - Independent Stampin' Up! Demonstrator.


Friday, 1 August 2014

Stamp Set Showcase Week 3 (7)

Day 7 of this weeks Stamp Set Showcase

LABEL LOVE

Those of you that read my blogpost yesterday will be pleased to know that we eventually recovered the missing stamps after an untimely drop of the stamp set with two stamps tumbling under my built in dressers in the workshop,

And yet again, Clothes Hangers came to the rescue ... and helped out my husband in retrieving my wayward stamps (Yeh!)

And you will notice that I am again featuring the Lovely Lace TIEF, as I just loved it when I used it for the first time yesterday.

I apologise if todays tutorial is lengthier than normal, but I promise it isn't complicated ... honest!


Begin by triming a piece of Whisper White cardstock to 15cms x 30cms. Score the long side at 15cms to make your card blank.
Trim a piece of Mossy Meadow cardstock to 14.5cms x 14.5cms

Trim another piece of Whisper White cardstock to 14cms x 14cms

Using Memento Black ink to stamp the Corner Garden stamp to the bottom left of the Whisper White cardstock. Give the ink a few minutes to dry.
Next is your chance to colour in the stamp set better than me! Remember, start with the lightest colour of each blendability set, then the medium colour for highlights, and the darkest colour for contrast. Then go over the whole section you are working on with the lightest pen again to blend the colours together, Leave the cardstock to completely dry.


Whilst waiting for the above to dry, you can dry emboss a piece of Mossy Meadow cardstock to 3.5cms x 14.5cms. Run this through your Big Shot or Texture Boutique. Adhere this to the right hand side of the coloured card panel.

Then stamp your choice of Label Love stamp, and stamp it in Mossy Green. ink. Punch it out using the Artisan Label Punch. Punch another two Artisan labels from Mossy Green cardstock. You will use the coloured cardstock to make the label for your sentiment. Cut one in half on the vertical, and the second on the horizontal. adhere the label pieces to the corresponding label pieces to the reverse of the stamped sentiment creating a layered label. App;y Stampin Dimensionals to the reverse, 


Now to give an extra dimension to your card. So again using Memento Ink for the stampin, stamp 3 butterflies from Papillpn Potpouri stamp set, and 3 smaller flowers from the Forever Florals stamp set. Colour both the butterflies and the extra flowers using Blendabilities pens. Apply Stampin Dimensionals to the reverse of the butterflies and flowers. Artistically place on top of your inked image (i.e. cotner garden).  Add some Basic Pearls to the butterflies and the middle of a few flowers. Use the Bird Builder Punch to punch out some leaves. Adhere the leaves to Corner Garden around the flowers ( use Tombow for this),

Adhere your Sentiment to the top right of the card,

Now you have a 3D card for someone special

Happy Stamping
Kim xxx
Table built using Product Table Builder by The Crafty Owl - Independent Stampin' Up! Demonstrator.

Contact us for details of our Bespoke Handmade Greetings Cards, Wedding Invites, Favours, Gift Boxes etc

Telephone: 08432896848
Text: 07759587004

Or Order Online 24/7