
The card I am sharing with you today, is an unusual one for me as I rarely using Designer Series Papers in my Card Making since I usually reserve DSP for decorating boxes, favours and treat bags.
But I fell in love with the colours in the Designer Series Paper, of Crumb Cake and Night of Navy, and so I decided to use the DSP along side my card design, .... et voila!!
I hope you agree?

Here are the products I have used today
Click on product icon for more information, or to place an order
 |  |  |  |  |
 |  |  |  |  |
 |  |
Table built using Product Table Builder by The Crafty Owl - Independent Stampin' Up! Demonstrator.

And here is how I made today's card:
Begin by making your 6" square Card Base using the Thicker A4 Whisper White Cardstock
Next, trim another piece of Whisper White Cardstock to 12cms square
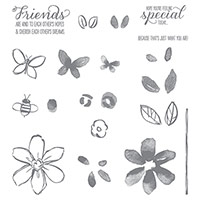
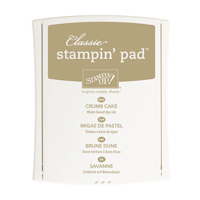
Randomly stamp this piece of cardstock with the larger flower using Night of Navy Classic Ink Pad.
Next, randomly stamp the butterfly in the stamp set using Crumb Cake Classic Ink Pad.
Wrap around a piece of Night of Navy Seam Binding Ribbon, and tie a bow.
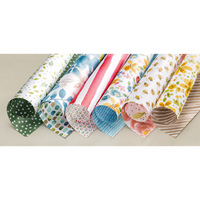
Adhere a 3cm strip of English Garden Designer Series Paper (DSP) to the left hand side of the stamped panel, using some Fast Fuse Adhesive.
Now take the least defined large flower stamp and stamp it onto a strap of Whisper White Cardstock using Crumb Cake Classic Ink Pad.
Overstamp this with the co-ordinating outline flower stamp using Night of Navy Classic Ink Pad.
Cut the flower out by hand using your Paper Snips.
Apply a Stampin Dimensional to the back of the flower and attach to the stamped panel.
Mat (layer) this stamped panel onto a slightly larger Night of Navy Cardstock Panel.
Mount this panel onto the card base using Fast Fuse Adhesive.

Now for the sentiment.
Stamp your sentiment onto a piece of Whisper White Cardstock, using Night of Navy Classic Ink Pad.
Punch 2 more Decorative Label s out using Night of Navy Cardstock.
Cut one of the Night of Navy labels in half on the horizontal, and the other in the vertical.
Apply plenty of Fast Fuse Adhesive to the back of the stamped label
Attach the corresponding Night of Navy cardstock pieces behind the stamped label to give the impression of a layered label.
Add some Stampin Dimensionals to the back of the label and attach to your card front.
And there you have it.
Now it is over to you .... your turn to make this card
Happy Stamping
Kim xxx
No comments:
Post a Comment