
Today I have a little gift idea for you. It could be made by a child for a Mothering Sunday Gift, If you are a Stampin Up! Demonstrator Like me, This project would also make a great Hostess Gift, of even a gift for your Down lines (this is the term used for people who have joined your Team as a Demonstrator. Not that you have to demonstrate anything if you don't want to, as you can join just to take advantage of the generous discount you would get on all your paper craft products, that will better feed your crafty habit he he!
But, you might also just want to make a pretty cover for your home's ' Own Brand' Tissues ...
If you haven't already given your children the opportunity to learn how to use rubber stamps, this is the perfect chance for you to do so. My grandchildren begin with belly, hand & feet painting, but by 3 years old, they have to capacity to make a right royal mess using stamps and inks he! Put plastic bags on your table to protect it from mess, and newspaper under that and let them get on with creating

_________________________________________________________________________
- As you scroll down today's
blog post, you will find :
- icons of all the products used to create today's card - click on them to visit my online store;
- & a typed tutorial
Feel free to CASE any of my creative
projects (Copy & Paste Everything)
Click on the icons below to view/order
any of the products used in today's tutorial


Tutorial
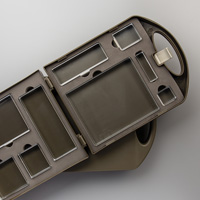
1. Trim am A4 piece of Cardstock to 17 x 17 cms; Score all sides at 2.5 cms; Using (Lid) Black Archival Ink Pad, randomly stamp the lid of the box; Turn over and using a pencil & ruler, mark the centre of the box by drawing a diagonal line rom each of the top corners; Die Cut using the 4th smallest Circle Die (approx 2"
diameter), lining up the circle over the penciled cross
2. Fold and Burnish all score lines on the lid, using a Bone Folder; make tabs by snipping to the first score line on each outside square ... there should be two pairs of tabs that are opposite each other; Apply a small amount of Tombow Liquid Glue to each tab and adhere to the long sides to create the box lid.
3. (SIDES) Trim two (2) pieces of Mint Macaron Cardstock to 24 x 12 cms; Score one end of each piece at 1cm & 11.5 cms; Randomly Stamp the 2 pieces of cardstock using a variety of the Grateful Bunch Stamp Set and Archival Black Ink Pad.; Fold and Burnish the score lines on both pieces, and using Tear & Tape Adhesive along the 1 cm tabs on each piece, adhere the cardstock together to create a four sided square & slide this over your Box of tissues & top with the lid, pull the first tissue through the hole and you are ready to go. Feel free to add decoration to your box as you wish.

How to Contact or Follow Me
Kim Tolton,
Independent Stampin Up Demonstrator.
Card & Papercraft
Tutorials
Please feel free to
comment below, and ask away with any questions. You can also find me via the
links below
Blog:
Online Store:
Stamping @ The Warren
Craft Forum:
Email:
kim.tolton@googlemail.com
youTube
Pinterest:
Google +
Facebook:
Twittert:
Instagram:
@kim.tolton
LinkedIn:
No comments:
Post a Comment