
Today is one for the Children or Grandchildren like us, you will be caught up in the endless stream of Kiddies Birthday Parties! They seem never ending, and out at least one of our grandchildren has a party to attend each week, Plus 2 of our 3 grandchildren have birthdays coming up soon, So I am already thinking about party treats and, favour boxes and gifts. Our eldest grandson has Asperger Syndrome, and one of his obsessions is Green, along with Dinosaurs, Cards & creatures of the forest
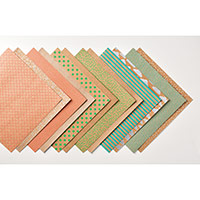
So here is the first creation, a google eyes Critter .... I have used the 12" x 12" Shine On Printed Kraft Cardstock double sided Specialty Designer Series Paper Pack (DSP) from Stampin Up! to make this little guy.The Curvy Keepsake Boxes are easy for Children to make (with a hand for the die cutting) and it is a great way to get children involved in crafting, and playing a part in planning their party. I have kept it super simple so the Kids can draw the faces and add on the eyes, The legs and feet are made using the Sweetheart Punch.
So here is the first creation, a google eyes Critter .... I have used the 12" x 12" Shine On Printed Kraft Cardstock double sided Specialty Designer Series Paper Pack (DSP) from Stampin Up! to make this little guy.The Curvy Keepsake Boxes are easy for Children to make (with a hand for the die cutting) and it is a great way to get children involved in crafting, and playing a part in planning their party. I have kept it super simple so the Kids can draw the faces and add on the eyes, The legs and feet are made using the Sweetheart Punch.

- As you scroll down today's
blog post, you will find :
- icons of all the products
used to create today's card - click on them to visit my online store;
- A Video Tutorial
- & a typed tutorial
Feel free to CASE any of my creative
projects (Copy & Paste Everything)
Click on the icons below to view/order
any of the products used in today's tutorial


Watch the Video Below
Tutorial
1. Trim a piece of Shine On Cardstock to 15 cms x 30 cms
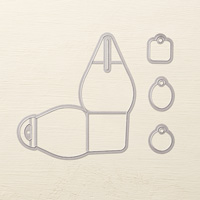
2. Die cut 2 pieces of the Curvy Keepsake Box, ensuring you cut both pieces with the same side of the cardstock (i.e. the same pattern)
3. fold and gently burnish the score lines.
4. Apply adhesive to the base square of one die cut. Adhere the two pieces together, ensuring that the two rounded pieces are opposite each other, and the two pointed pieces are also opposite each other
5. Add the google eyes and draw a mouth using a Black Marker, on one of the Rounded ends
6. Using a Bone Folder, Gently burnish the cardstock on the rounded ends to help shape a curve; bring the two rounded ends together at the top tabs, and gently fole one pointed end over the top of those rounded tabs )there is a small notch you need to slot the cardstock into to secure it), repeat with the other pointed end.
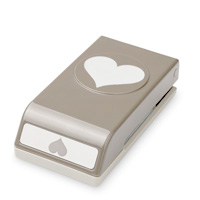
7. Punch out 5 Hearts five hearts from the scrap cardstock, using the Sweetheart Punch.Add a strip of adhesive to the underside of the box, nearest the Critters face; position 2 the hearts in an inverted V shape and lay the third u in the middle of these and press the box down onto these hearts to adhere them.
8. To make the legs, score one edge of each remaining heart at 0.5 cm; fold and burnish; place adhesive on the top side of the small tabs and attach to either side of the box
2. Die cut 2 pieces of the Curvy Keepsake Box, ensuring you cut both pieces with the same side of the cardstock (i.e. the same pattern)
3. fold and gently burnish the score lines.
4. Apply adhesive to the base square of one die cut. Adhere the two pieces together, ensuring that the two rounded pieces are opposite each other, and the two pointed pieces are also opposite each other
5. Add the google eyes and draw a mouth using a Black Marker, on one of the Rounded ends
6. Using a Bone Folder, Gently burnish the cardstock on the rounded ends to help shape a curve; bring the two rounded ends together at the top tabs, and gently fole one pointed end over the top of those rounded tabs )there is a small notch you need to slot the cardstock into to secure it), repeat with the other pointed end.
7. Punch out 5 Hearts five hearts from the scrap cardstock, using the Sweetheart Punch.Add a strip of adhesive to the underside of the box, nearest the Critters face; position 2 the hearts in an inverted V shape and lay the third u in the middle of these and press the box down onto these hearts to adhere them.
8. To make the legs, score one edge of each remaining heart at 0.5 cm; fold and burnish; place adhesive on the top side of the small tabs and attach to either side of the box

How to Contact or Follow Me
Kim Tolton,
Independent Stampin Up Demonstrator.
Card & Papercraft
Tutorials
Please feel free to
comment below, and ask away with any questions. You can also find me via the
links below
Blog:
Online Store:
Stamping @ The Warren
Craft Forum:
Email:
kim.tolton@googlemail.com
youTube
Pinterest:
Google +
Facebook:
Twittert:
Instagram:
@kim.tolton
LinkedIn:
No comments:
Post a Comment