
Today I have another Butterfly Basics / Butterfly Thinlets Combo for you
The card design was CASED from Stampin Up's Impressions Magazine.
Now, not just anyone can get the Impressions Magazine as it is exclusive to Stampin Up Demonstrators. It is packed with Creative ideas and project recipes
Now the project that inspired me to make this card, was in fact, used on a Mini Treat Bag project.
I saw it and could see the scope for making it into a card, and here it is
I hope you like it?
Please note that at the time of posting this, the Butterfly Thinlets are unavailable to order. We are hoping that stocks will be available in the near future, so do check availability often via my website by clicking here
Please note that at the time of posting this, the Butterfly Thinlets are unavailable to order. We are hoping that stocks will be available in the near future, so do check availability often via my website by clicking here
So here is the tutorial

you will need a 6" square White Card Blank (card base)
Trim a piece of Baked Brown Sugar cardstock to 12 cm x 12 cm
Randomly stamp the cardstock with the tiny flower stamp using Soft Suede ink
Use a uniball White Gel Pen to add a white centre to each stamped flower.
Stamp the chevron like long stamp at the base of the card using Basic Black ink.
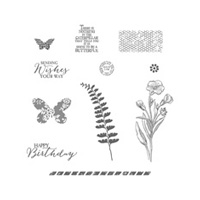
Down the centre of the card, stamp the Honeycomb stamp from Butterfly Basics stamp set, using Strawberry Slush ink.
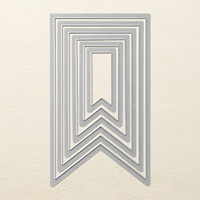
Now die cut a banner from Pistachio Pudding cardstock
Mat this panel onto a piece of Mossy Meadow cardstock measuring 12.5 cms x 12.5 cms
Next die cut the medium Butterfly using the Butterfly thinlets die from Crisp Cantaloupe cardstock.
TIP
When die cutting using intricate Dies, use the following 'sandwich for your Big Shot:
Magnetic Platform
Cutting Plate
Tumble Drier Sheet
Cardstock
Wax Paper
Metal Die (cutting blade facing down)
Cutting Plate
Run the sandwich through your Big Shot back and forth a couple of times,
This will allow all those teeny pieces from the die to stick to the dryer sheet and give a crisper die cut.
Add a Stampin Dimensional to the back of the butterfly and attach to your card front on top of the banner.
Stamp the Sentiment of your choice from the Butterfly Basics stamp set onto White Vellum using Black Stazon Ink
Once dry, trom the Vellume to size and use your paper snips to make banner ends to the stamped vellum
Adhere this to the Butterfly using Glue Dots.
Thread a metal button from the Artisan Embellishment Kit with Linen Thread, and tie a bow leaving large loops and long tails.
Attach to the body of the butterfly
And there you have it!

If you would like
to ask any questions on techniques or products, or anything else related to my
blog posts, please feel free to ask away
Happy Stamping
Kim xxx
Contact me to
order:
Telephone/Txt:
07759587004
Email: kim@stampinupatthewarren.com
Or Order
Online 24/7
Or Click on the
image of the products used below and it will take you straight to my online
store
 |  |  |  |  |
 |  |  |  |  |
 |  |  |  |  |
 |  |  |  |  |
Table built using Product Table Builder by The Crafty Owl - Independent Stampin' Up! Demonstrator.
No comments:
Post a Comment