
Today is Speedy Saturday!
If you are short on time but need a quick note card to send or give to someone you care about, then today's project is perfect for the job. It will suit both men and women, especially those that love gardening, growing herbs or enjoys baking Rosemary Foccacia or ciabata
Just thinking about it, I can imagine the smell of rosemary and fresh bread coming straight out the oven!
Yes, I LOVE baking bread .... another passion of mine. I find it perfect for de-stressing, and love the texture of the bread dough, and how it changes as I knead the dough. hmmmm ...
Even better, is that you can purchase the From The Garden Stamp Set used today at a discount until the end of business next Tuesday, as it is in Stampin Up!'s weekly Deals for this week.
I have used Stampin Up!'s pre-scored Crumb Cake Note Cards (they come in packs, along with crumb cake envelopes).

You are going to be blown away with how quick it is to make this card, making it perfect for making in bulk if you enjoy sending note cards to friends and family.
Take a scrap of Whisper White Cardstock and stamp the Rosemary Stamp using Old Olive Classic Ink Pad, & using 1st, second & third generation stamping (i.e. stamp the rosemary sprig 3 times without re-inking) to create depth to the project. Alter the heights of the sprigs, to add interest.
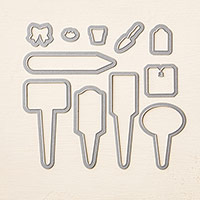
Stamp the sentiment and the outline of the 'peg' using Early Espresso classic ink pad onto Whisper White Cardstock and Die Cut using the co-ordinating Hand Picked Die.
Then die cut 3 flower pots from the same Framelit pack, from Whisper White cardstock.
I used a combination of Sahara Sand and Crumb Cake Stampin Write Marker Pens to colour in the pots, but you could have your pots any colour you like and mat (layer) onto co-ordinating cardstock.
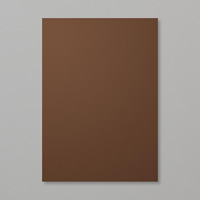
For my project, I have mat the stamped panel onto Early Espresso Cardstock as I want the green of the Rosemary to pop up on this card.Attach to your card blank using a little Tombow Multi-purpose liquid glue (it doesn't warp the cardstock).
Attach Stampin Dimensionals to the reverse of the pots and 'Peg' - you may need to cut the foam pads down so they are not visible on the finished card.
Attach these elements to your card front and you are done!
I made this in less than 5 minutes, but the time will differ depending on your skill level.
But, you know what they say ... practice makes perfect!
Now it is your turn to have some fun with this stamp set and co-ordinating die.
Do send me a request to join my Pinterest Community Board so you can post your Stampin Up Projects on there (so long as there is some SU products in your projects, you can post photo's)
I would love to see what you are all making?
Kim xxx

If you would like to
become a member of my Pinterest Community Board where you will be able to post
your own Stampin Up! Makes please email me via
If you have any
questions on techniques, orders, products etc, please ask away by adding
comments below, or you contact me via:-
Email me: kim@stampinupatthewarren.com
Telephone / Text:
07759587004 OR
Order Online: http://www.stampinupatthewarren.stampinup.net

Place your orders by quickly and easily clicking on the product images below and it will
take you straight to the products in my online Store
 |  |  |  |  |
 |  |  |  |  |
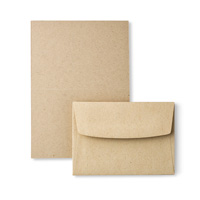 |  | 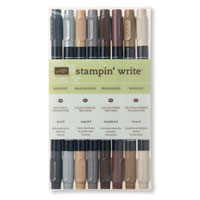 |  |
Table built using Product Table Builder by The Crafty Owl - Independent Stampin' Up! Demonstrator.

No comments:
Post a Comment