
Now I am making no excuses for again pairing up Gorgeous Grunge & Guy Greetings Stamp Sets today, because they are a match in heaven when it comes to making cards for men.
Change the stamp, colour scheme & card template and you have a different product
And today's A6 card is unabashfiully simple
The Items you will need are:
Big Shot (with Magnetic Platform is you have it)
Window Frame Framelits
Decorative Dots TIEF
Banner Punch
Stampin Sponges
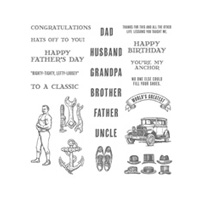
Guy Greetings Stamp Set
Gorgeous Grunge Stamp Set
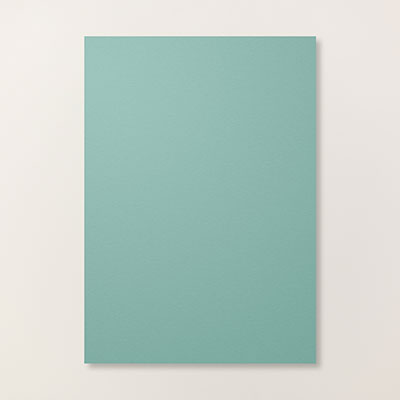
Lost Lagoon classic ink pad
Lost Lagoon A4 Cardstock
Whisper White Cardstock
Sweet Dreams Washi Tape
White Card Blank & Envelope
Adhesives

Begin by trimming a piece of Lost Lagoon cardstock to 14.3cms x 10 cms
Then trim a piece of Whisper White cardstock to 13.8cms x 9.5cms
Stamp the white panel with the Fine Splatter stamp in the Gorgeous Grunge stamp set using Lost Lagoon Ink
Ink up a Stampin Sponge with Lost Lagoon ink (I cut my sponges into 6 or 8 wedges and staple a pice of cardstock at the thinnest end to hold whilst sponging) and sponge the edges of the cardstock.
Now stamp the hats stamp from Guy Greetings stamp set using Basic Black ink, allow to dry (to prevent smudging) and die cut using the Window Frame Framelits. Sponge the edges of the cardstock as before.
Next, die cut the next size up Window Frame Framelit using Lost Lagoon Cardstock
Dry emboss this label using the Decorative Dots TIEF using either your Big Shot or a Texture Boutique
Mount the stamped panel on top of the embossed label using Stampin Dimensionals

Apply stampin Dimensionals to the back of the layered label.
Before mountint the Topper onto the card front, you want to add a strip of Washi Tape across the middle. I used the Lost Lagoon Tape in the Sweet Dreams Washi Tape set.
Mount your topper
And then adhere the card front to your card blank using tiny amounts of Tombow Multi-Purpose Glue
(NOTE: do not use PVA or similar liquid glue or your cardstock will warp)
Finally, all that is left to do is to make your sentiment tag
Stamp the sentiment onto a scrap of Whisper White Cardstock, using Basic Black ink, & allow to dry.
Whilst you are waiting for the black ink to try, you can make another tag by trimming a scrap of Lost Lagoon cardstock to 1.5cms wide, and use the Banner Punch to create banner ends to the tag. To do this you want to place the cardstock in the through top of the punch (instead of at the front) and guide the cardstock between the cutting blades, then punch. Turn the tag around and repeat with the opposite end.
Now wrap some of the Washi Tape around the punched banner, ensure you have completely covered the cardstock. Trim any excess Washi tape
Now trim your sentiment down so the cardstock is 1 cm wide. Punch banner ends as before.
Attach the two tags together using Glue Dots, and offset them as shown in the photo's
And that is it!!
Another masculine card made for your card stash.

If you
would like to join my Pinterest community board where you will be able to post
your own Stampin Up creations. Simply email me and I will add you to the board
kim@stampinupatthewarren.com
If you would like
to ask any questions on techniques or products, or anything else related to my
blog posts, please feel free to ask away
Happy Stamping
Kim xxx
Contact me to
order:
Telephone/Txt:
07759587004
Email: kim@stampinupatthewarren.com
Or Order
Online 24/7
Or Click on the
image of the products used below and it will take you straight to my online
store
 |  |  |  |  |
 |  |  |  |  |
 |  |  |  |  |
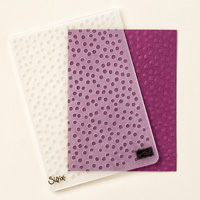 |  |  |  |
Table built using Product Table Builder by The Crafty Owl - Independent Stampin' Up! Demonstrator.


No comments:
Post a Comment