
The last day of this weeks Stamp Set Showcase
WETLANDS
Today I have another Brayered card, building on yesterdays blog, so if you are a newcomer to brayering, and haven't seen yesterdays blog, do pop over to have a read before starting todays card..
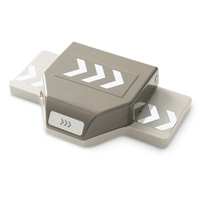
But todays technique is using the Chevron Punch to make a trellis that will give contrast to todays card.

Start by Trimming a piece of Whisper White cardstock to 9cms x 9cms
Create a single 'Dune' mask and breyer the loser section of the card with Sahara Sand. Move the mask a little and repeat the brayering with Crumn Cake, move the mask again leaving a bigger gap between the mask and the previous brayering (this creates light and shade). repeat until you have roughly reached the mid line of the cardstock you are brayering.
Punch a 1! circle from Printer paper and place this mask where you want your moon to be.
Brayer the sky first with Soft Sky ink, then use a little Pool Party ink to create a few brighter patches in the sky ... be light handed with this and take your time.
I tend to do a mock up on my grid paper and test the brayering and colours on that. Some Printer paper would work too. Remove the moon mask.

Now get your black Memento ink and stamp the smaller wading birds stamp where the dunes meet the sky.
Now stamp the grass stamp several times along the bottom edge of the cardstock using Basic Grey ink.
Stamp your sentiment onto a scrap of Whisper White cardstock and die cut using one of the label die in the Project Life Cards & Labels Die set.
Die cut two more labels using Crumb Cake cardstock.
The crumb cake labels are going to create a layered sentiment.
The first crumb cake label needs to be cut in half horizontally, and the second cut in half vertically. Stick the corresponding cardstock pieces to the Sentiment label (ink the edges of the sentiment label) using Tombow Multipurpose Glue (use a very light hand with this as a little goes a long way.
Now for the chevron punch.trim two strips of crumb cake cardstock to 4 cms wide
Get your chevron punch and if you look at the front of the punch, you will see two black lines ... I have used a fine marker to extend these lines to the front edge of the punch so I can see the marks from the front. These help you to line up your punch precisely.
Punch the two strips of crumb cake cardstock all the way along (do not dispose of the punched out bits, pop them in a container for another day.
You are now going to interlock the two strips. Start at the top and slot each piece behind the strip behind, creating a lattice (see my photo). Trim the lattice to 14.5 cms
This will be attached to the left hand vertical border on the piece of 14.5cms x 14.5cms Night of navy cardstock listed below

Trim a piece of Night of Navy cardstock to 9.5cms x 9.5cms
Trim a piece Whisper White cardstock to 10cms x 10cms
Trim a piece of Night of Navy cardstock to 14.5cms x 14.5cms
Layer up the brayered cardstock after sticking the lattice border to the left hand border of the largest piece of Night of Navy cardstock.
Mount the layered brayered cardstock to the 15cms x 15cms white card blank using Stampin Dimensionals.
Pierce a hole to the bottom left corner of the layered panel.
Wind Linen thread around 2 or 3 fingers approximately 7 or 8 times and tie off with a knot.
Stick the linen thread bow down on the pierced corner using Glue Dots, then insert an antique brad.
Stick the layered card to the 15cms x 15cms card blank.
Stamp your sentiment on a scrap of Whisper White cardstock, & die cut using one of the label Die in the Project Life cards & labels Die set.
Cut two extra labels in Crumb Cake to create the layering for the sentiment label (see yesterdays post for the 'how to' on creating a layered sentiment label.
Attach to the lower section of the card using a combination of Glue Dots and Stampin Dimensionals.
 |  |  |  |  |
 |  |  |  |  |
 |  |  |  |  |
 |  |  |
Table built using Product Table Builder by The Crafty Owl - Independent Stampin' Up! Demonstrator.
Happy Stamping
Kim xxx
Contact us for further information on our Handmade Greetings Cards, Wedding Stationary and Gift Packaging Service
Telephone: 08432896848
Text@ 07759587004
Or Shop Online for all your papercraft supplies 24/7


No comments:
Post a Comment