
I can barely believe that Christmas is just over 4 weeks away. The Weather is SO mild here in the South East of the UK, that we haven't as yet had to put our central heating on! Such a contrast from the past 3 Novembers! However, our amazing old Oak Tree is finally shedding it's leaves, which the goats are loving as they are partial to the odd oak leaf or two.
Watching those leaves fall was delightfully distracting, as I worked in my workshop he he
But I have managed to get half of my swaps for the SAB tour next week. I will post the photo next week ..
But back to todays ORNAMENTAL PINE Card
and the colour scheme is Old Olive, White and Gold, and helped along with the Deco Framelits.
I have made my 6" square Card Blank, you will find instructions on how to do this from many of my past blog posts.

Once you have your card blank, you can start layering it up. From bottom layer to the top layer, trim the following cardstock to:
Old Olive Cardstock to 14.5cms x 14.5cms
Whisper White cardstock to 14cms x 14cms
Layer up the above and adhere to one another with a little Tombow Multi-Purpose Glue and then
Next trim a piece if Old Olive Designer Series Paper (from the Brights DSP Pack) to 7cms x 13cms
Adhere this to the layered card on the left half of the cardstock..
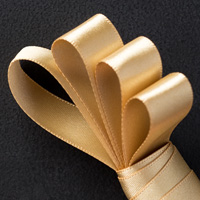
Wrap a piece of Gold Satin 5/8" Ribbon around the middle of the card topper and adhere to the back of the topper using Glue Dots.

Die Cut a Deco label from Old Olive cardstock (chose the best size framelit for your card).
Now die cut the next size down Deco Framelit die in Whisper White cardstock.
Ink the Ornamental Pine stamp using Baked Brown Sugar ink for the branch stem and Old Olive for the Pine (apply the ink carefully so you do not contaminate the ink pads)
Apply Stampin Dimensionals to the reverse of the Whisper White Stamped Die Cut.
Layer the two deco Labels and them mount them in the centre of the card topper. Mount the topper onto the card blank using small amounts of Tombow MP Glue.
Next stamp 3 pine cones using Golden Encore Ink, and cut out your paper snips. Remember to rotate the card and not the scissors for a better finish. Curl the pine cones from underneath using your bone folder to create a rounded cone, Apply Stampin Dimensionals to the reverse of each pine cone.
Adhere to the Deco Label.
Add 3 Stampin Dimensionals to the pine cones.
Next stamp your Sentiment onto a scrap of Whisper White cardstock using Versamark Ink, and without stamping, then ink the sentiment stamp with Old Olive Ink, Stamp, dust with clear Embossing Powder, remove the excess and heat set using your Heat Tool.
Trim down the sentiment to 1.5cms.
Create banner ends by inserting the sentiment label into the Banner Punch from the top (so one one end will be cut), turn and use the Banner Punch in the same way so you end up with a sentiment label with banner ends at each end.
Apply Stampin Dimensionals to the reverse and attach to the bottom centre of the card.
And there you have it. I would love to see your own versions of this card, via my Google + page, Facebook or Pinterest ...
 If you
would like to join my community board on my Pinterest account to post your own
photo'sping me your email address and I will add you
If you
would like to join my community board on my Pinterest account to post your own
photo'sping me your email address and I will add you
kim@stampinupatthewarren.com
If you would like to ask any questions on techniques or products, or anything else related to my blog posts, please feel free to ask away
Happy Stamping
Kim xxx
Contact me to order:
Telephone/Txt: 07759587004
Email: kim@stampinupatthewarren.com
Or Order Online 24/7
http://www.stampinupatthewarren.stampinup.net
Or Click on the image of the products used below and it will take you straight to my online store
 |  |  |  |  |
 |  |  |  |  |
 |  |  |  |  |
 |  |  |  |
Table built using Product Table Builder by The Crafty Owl - Independent Stampin' Up! Demonstrator.


No comments:
Post a Comment