
Firstly, I must apologise for this blog going out much later in the day today than normal. BUT I do have a very good excuse, as myself, Donna (head-over-heels-by-dlm) and Pippa Jones (Paperpiskies) were in Huntingdon until late last night getting the up coming news on next years Sale-A-Bration. There are some really exciting things coming this year, but I will tell you more as the event gets closer.
Hence, I was shattered when I got home just before midnight, slept in late this-morning, and then had one of our granddaughters for the day as she fell our of her bunk bed this-morning and bit her tongue rather badly, and so had the day off of school as a result (she is only 4 bless her!).
So all best plans and all that, have led to my blog being put on the back burner for more than a couple of hours ...
But after the wait, here is today's
LOVELY AS A TREE
Card
As you will see, it is my favourite card blanks, a 6" square (15 cms square). But you could easily adapt this card to suit an A6 card.

The basis of today's card is that wonderful Under The Tree Specialty Designer Series Paper that is a glorious double sided printed Kraft Card.
But you need to begin with the angled lines paper from the Gold Soiree Specialty Designer Series Paper, trimming it to 14.5 cms x 14.5 cms. Adhere tot he front of your Card Blank using a little Tombow Multi-Purpose Glue
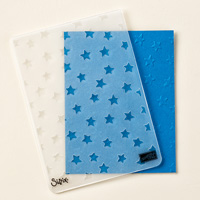
Next, trim a piece of that lovely green chevron card to 14.5 cms x 14.5 cms, but you are going to be using the reverse side of this cardstock (the teeny whiite stars), and emboss the stars side using the . . Lucky Stars Textured Impressions Embossing Folder (TIEF). Adhere this layer onto the card blank with a little Tombow)
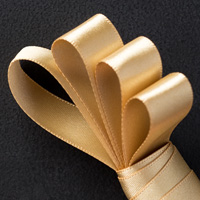
Next trim a piece of the green chevron paper to 12cms x 12 cms. Apply Stampin Dimensionals to the the reverse side. Wrap Around a piece of Gold 5/8" satin ribbon and attach to the back of the cardstock using Mini Glue Dots.

Now stamp the Conifer Tree onto a piece of Whisper White cardstock using Soft Suede ink. Over-stamp this with Gold Encore ink but offset it by 1-2 mm. You can use a Stamp-A-Ma-Jig to help site the stamp. Die cut the stamped cardstock using one of the Oval Framelits (the best fit for the card you are using). Apply Stampin Dimensionals to the revers side.
Then Die Cut a piece of Champagne Glimmer Paper using the next size up Oval Framelit. Mount this stamped oval onto the glimmer label and mount onto the card blank using Stampin Dimensionals. Tie a bow with the Gold Satin Ribbon and attach to the card front using mini Glue Dots.
Finish by stamping your sentiment from the And many More Stamp Set onto a scrap of the under the tree cardstock (the Kraft card with teeny white stars), trim to 1.5 cms in height and use the Banner Punch to create your banner ends to the label. Attach to the card front with Dimensionals.
Finish with a few Basic Rhinestones


EXTRA SAVINGS AND EARNINGS WHEN YOU JOIN THIS WEEK
For one week only (25 November – 2 December), you can join Stampin’ Up! as a new demonstrator for some great deals! Get a 25 percent discount on the Starter Kit with all the same great products included AND five percent cash back on all commissionable orders you place in December.
Get started here.
Happy Stamping
Kim xxx

Contact me to
order:
Telephone/Txt:
07759587004
Email: kim@stampinupatthewarren.com
Or Order
Online 24/7
Or Click on the
image of the products used below and it will take you straight to my online
store
 |  |  |  |  |
 |  |  |  |  |
 |  |  |  |  |
 |  |  |  |  |
 |
Table built using Product Table Builder by The Crafty Owl - Independent Stampin' Up! Demonstrator.


No comments:
Post a Comment